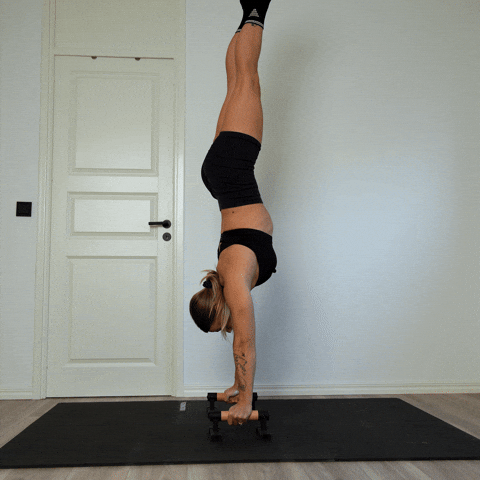
Negative Handstand To Tuck
The Negative Handstand To Tuck is a controlled eccentric movement where you lower from a full handstand into a deep tuck position with straight arms, targeting the front deltoids, core, and upper back through a demanding range of motion. The exercise trains shoulder strength and compression control by forcing you to resist gravity through a slow, deliberate descent while maintaining a tight tuck and forward lean. This is one of the most effective progressions toward the handstand press because it builds the exact strength and body awareness needed to eventually reverse the movement.
The Negative Handstand To Tuck is a controlled eccentric movement where you lower from a full handstand into a deep tuck position with straight arms, targeting the front deltoids, core, and upper back through a demanding range of motion. The exercise trains shoulder strength and compression control by forcing you to resist gravity through a slow, deliberate descent while maintaining a tight tuck and forward lean. This is one of the most effective progressions toward the handstand press because it builds the exact strength and body awareness needed to eventually reverse the movement.
How to Do Negative Handstand To Tuck
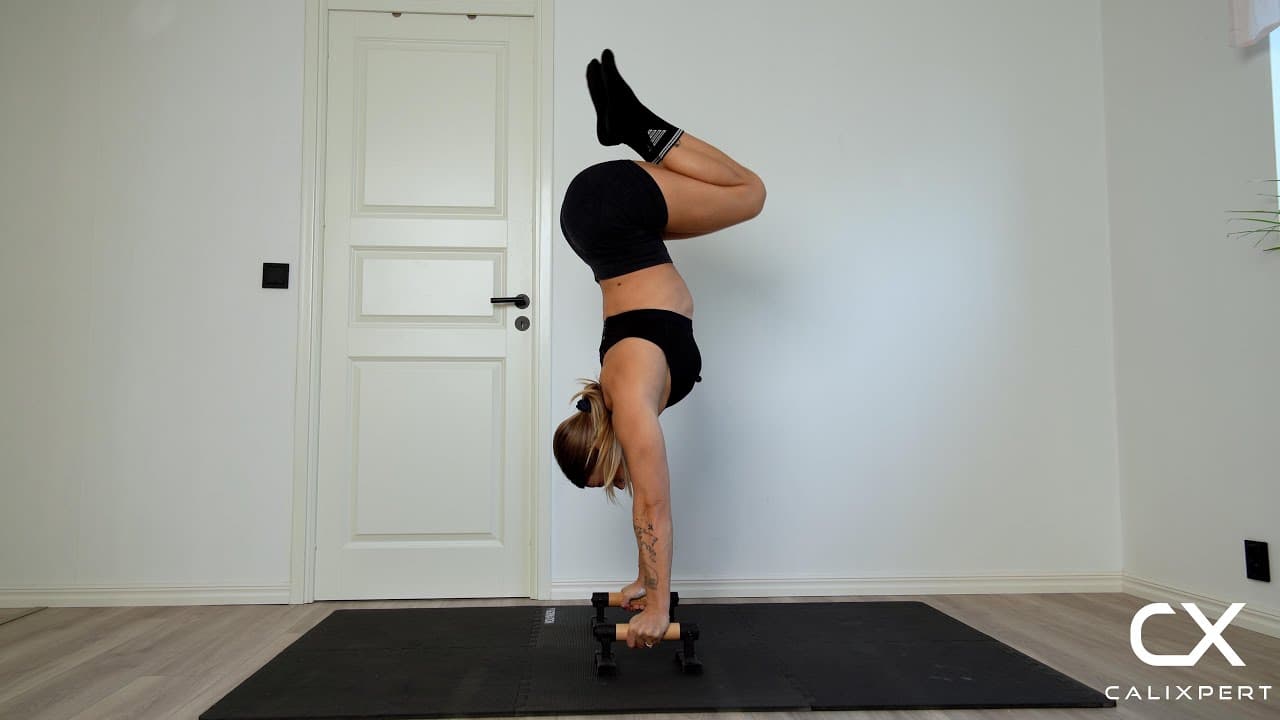
1. Kick Up to Full Handstand
Kick up into a stable handstand with your hands shoulder-width apart and fingers spread wide. Lock your arms fully and push the floor away through your palms to elevate the shoulders. Your body should form a straight vertical line from wrists to toes with your core engaged and legs together.
Lock the arms, push the floor away
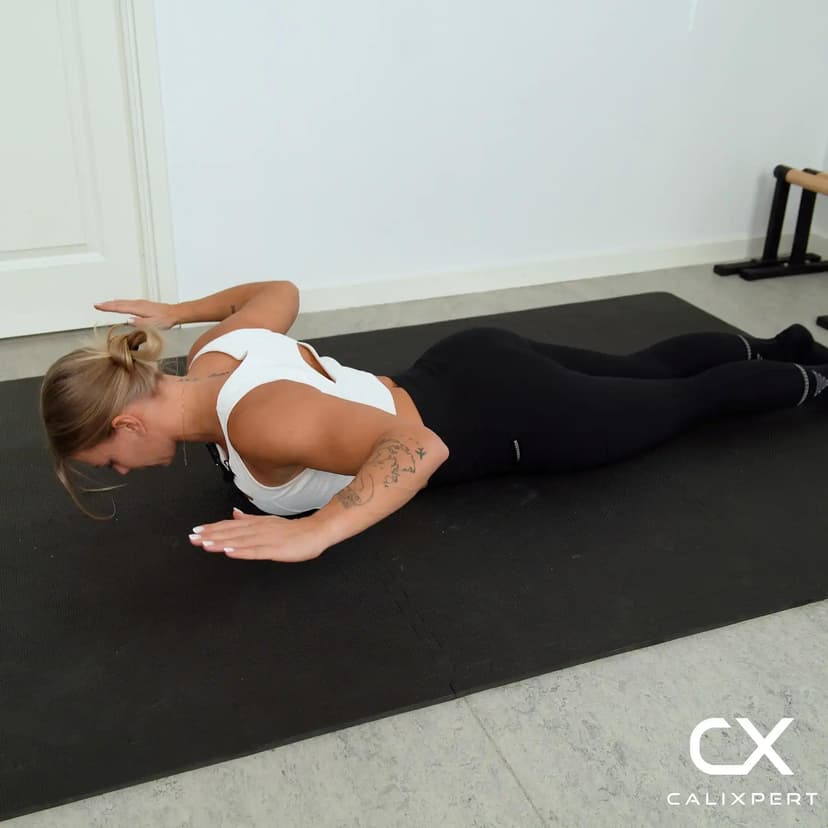
2. Tuck the Knees to Chest
From the full handstand, slowly draw both knees toward your chest into a tight tuck position. Compress your core hard to bring the knees as close to your chest as possible. This compression shifts your center of mass and is critical for maintaining balance through the descent.
Knees tight to the chest, squeeze hard
3. Lean the Shoulders Forward
As you enter the tuck, shift your weight slightly forward by leaning your shoulders past your fingertips. This forward lean counterbalances the weight of your hips moving backward and down. Without this lean you will fall away from the wall or lose control of the descent.
Shoulders ahead of the hands
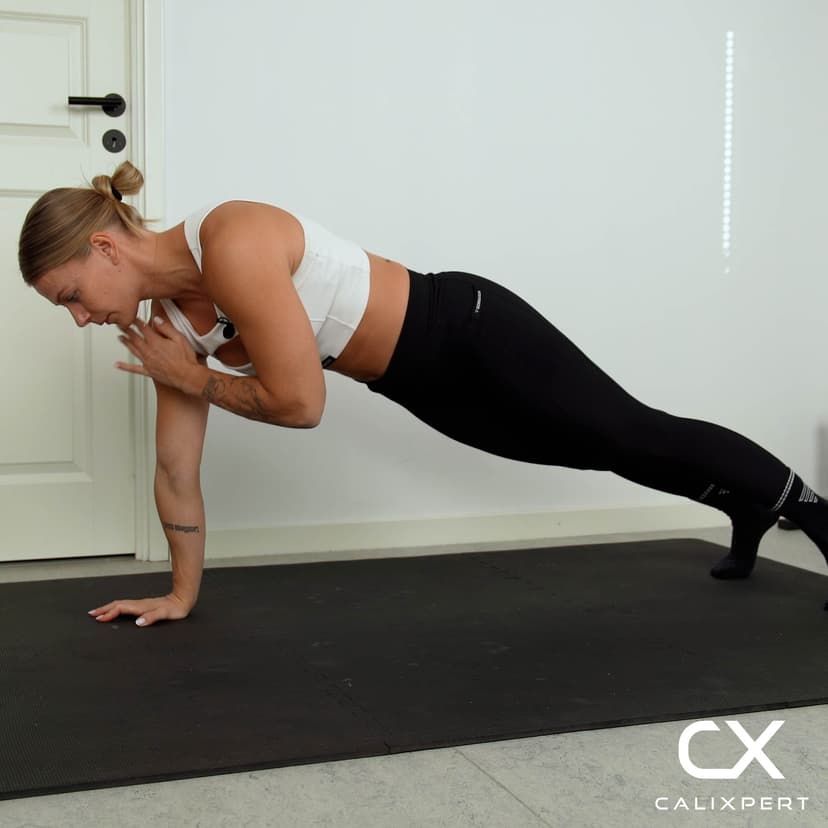
4. Lower Slowly in the Tuck
With your arms locked straight and your tuck compressed, begin lowering your body toward the ground as slowly as possible. Resist gravity through your shoulders and core, maintaining constant tension throughout the entire range. The slower you descend, the more strength you build. Aim for a 5 to 10 second descent as a starting target.
Slow and controlled, fight the gravity
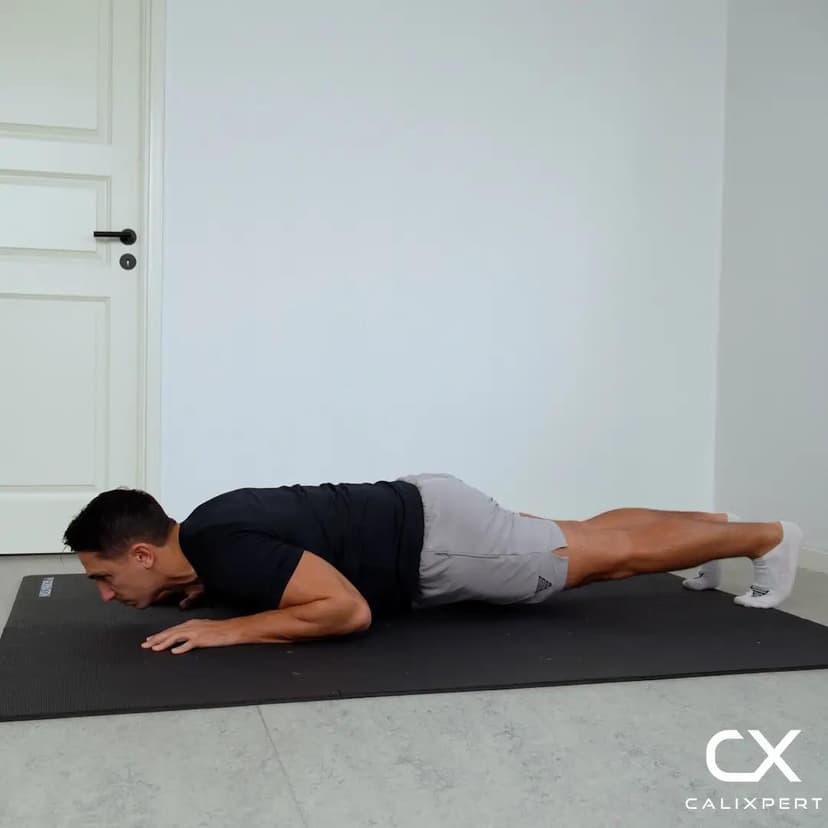
5. Touch Down With Control
Continue the controlled descent until your knees gently touch the floor. Keep your arms straight and shoulders active all the way to the bottom. Do not collapse or dump your weight at any point during the final phase of the movement. Reset your position fully before starting the next rep.
Soft landing, never crash down
Most people try to lower fast and call it a set, but the entire point of this exercise is the slow descent. If you cannot take at least 5 seconds from tuck to floor, go back to tuck handstand holds and build time there first. The strength you gain from a single 8-second negative is worth more than five reps where you just fall through the range.
Muscles Worked During Negative Handstand To Tuck
Primary Muscles:
Secondary Muscles:
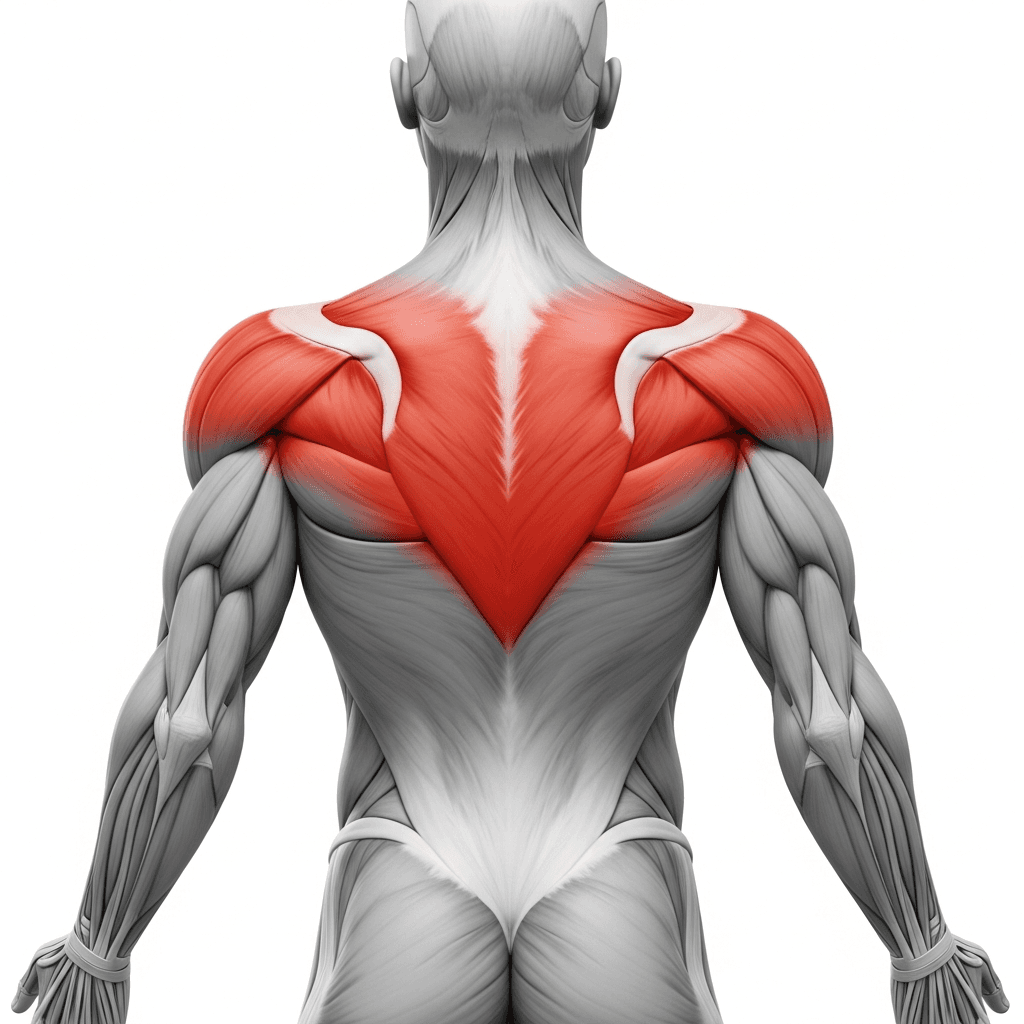
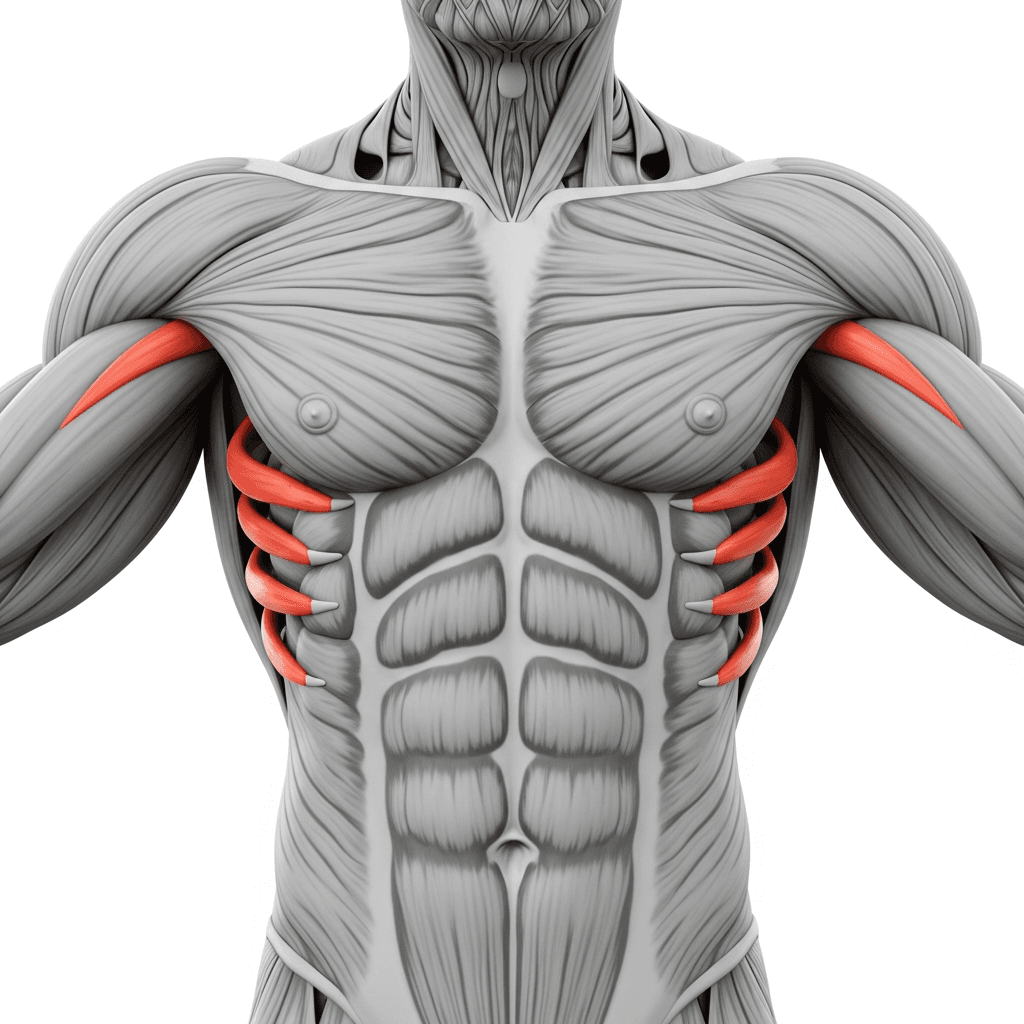

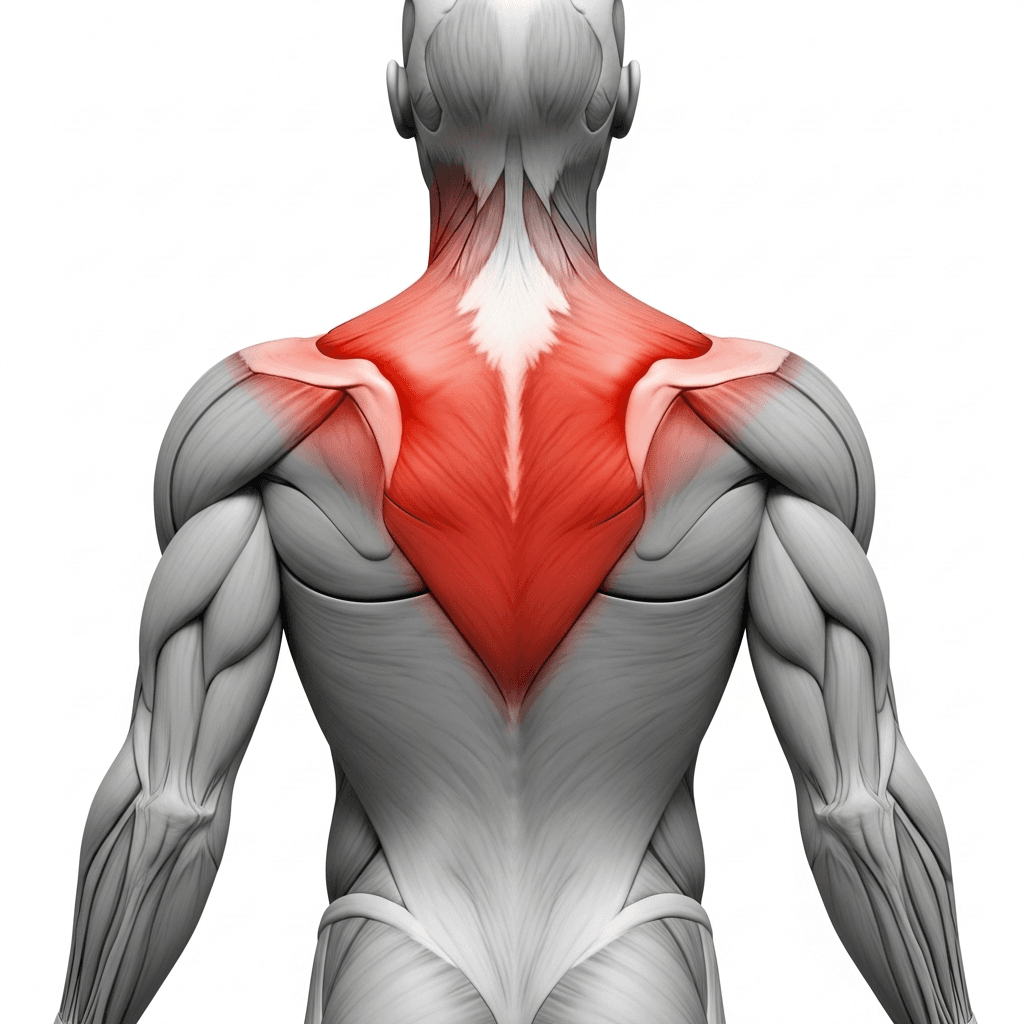
Primary Muscles
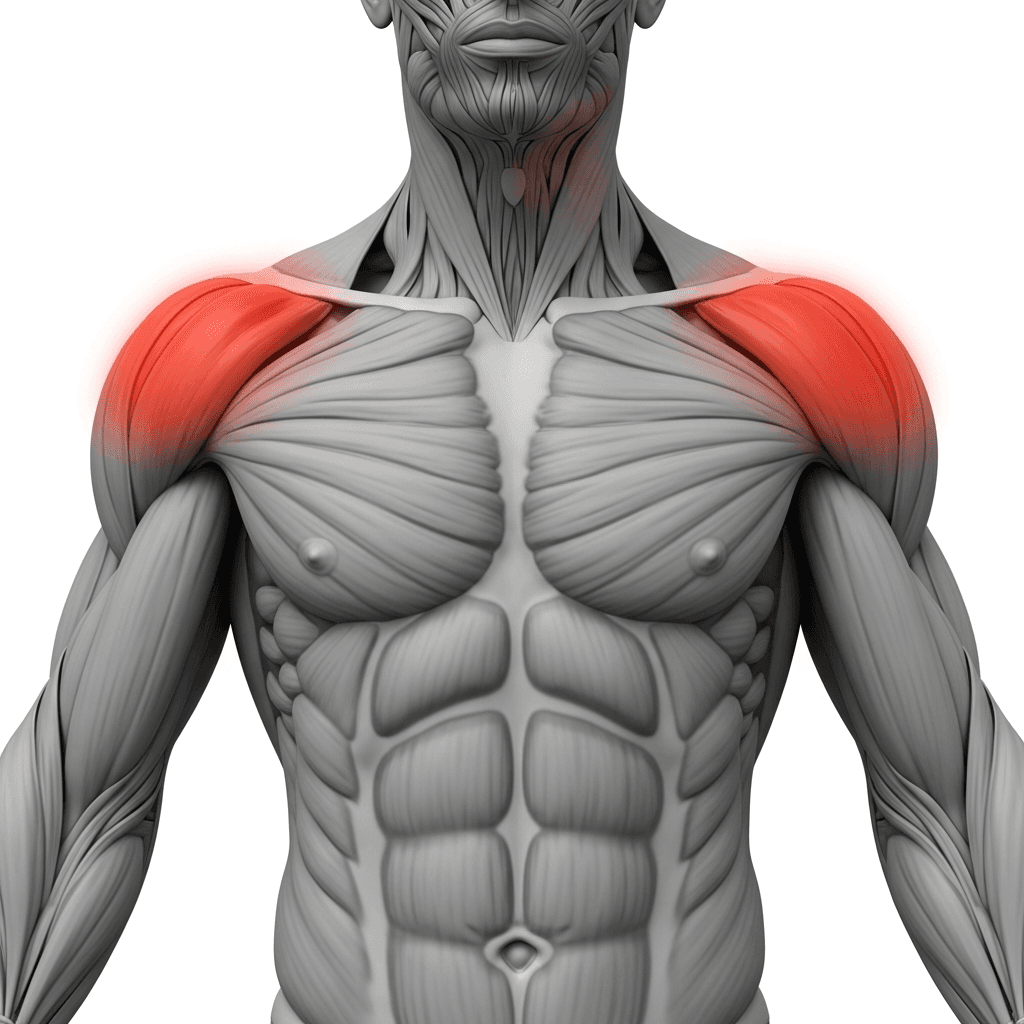
Anterior Deltoid (Front Deltoid) - The front deltoids bear your full bodyweight in a straight-arm overhead position and eccentrically control the descent from handstand to floor throughout the entire movement.
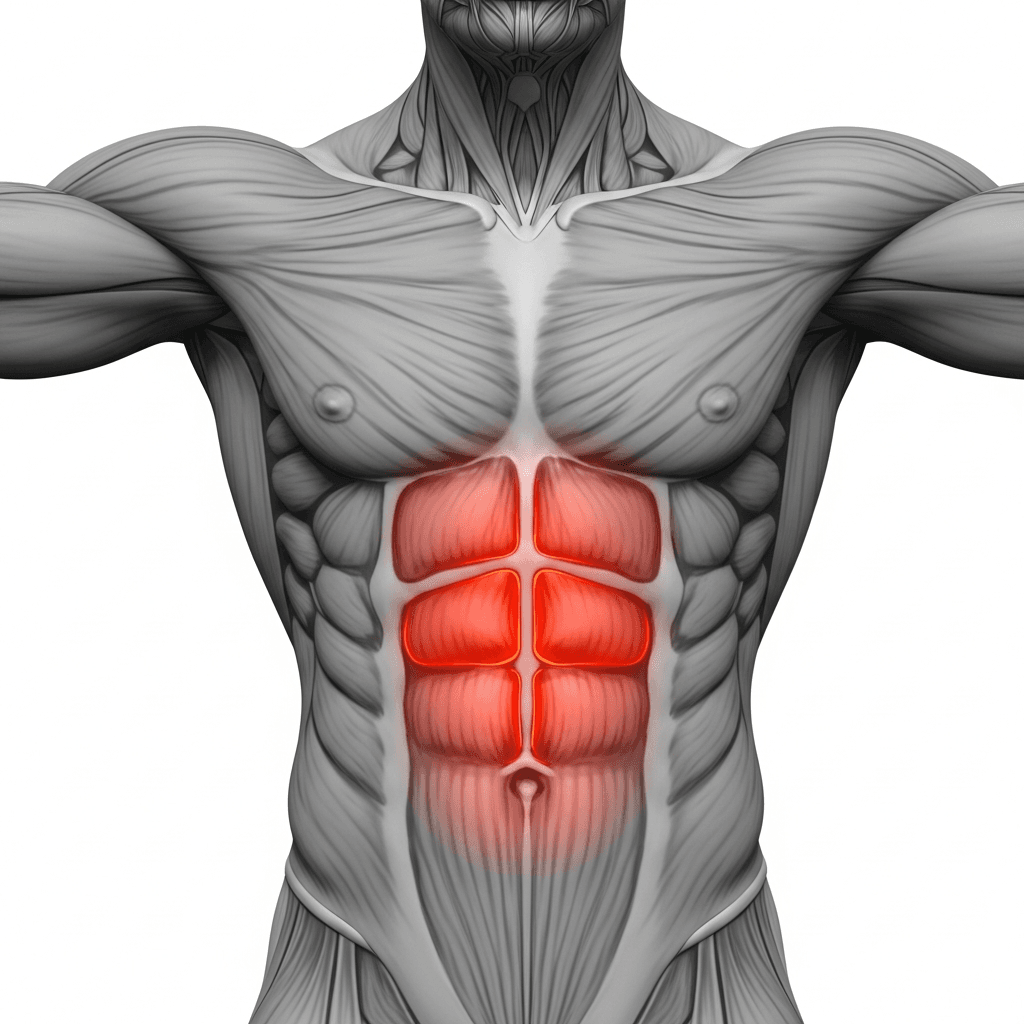
Rectus Abdominis (Abs) - The abdominals maintain the tight tuck compression, keeping the knees pulled to the chest and stabilizing the torso against the forward lean during the descent.
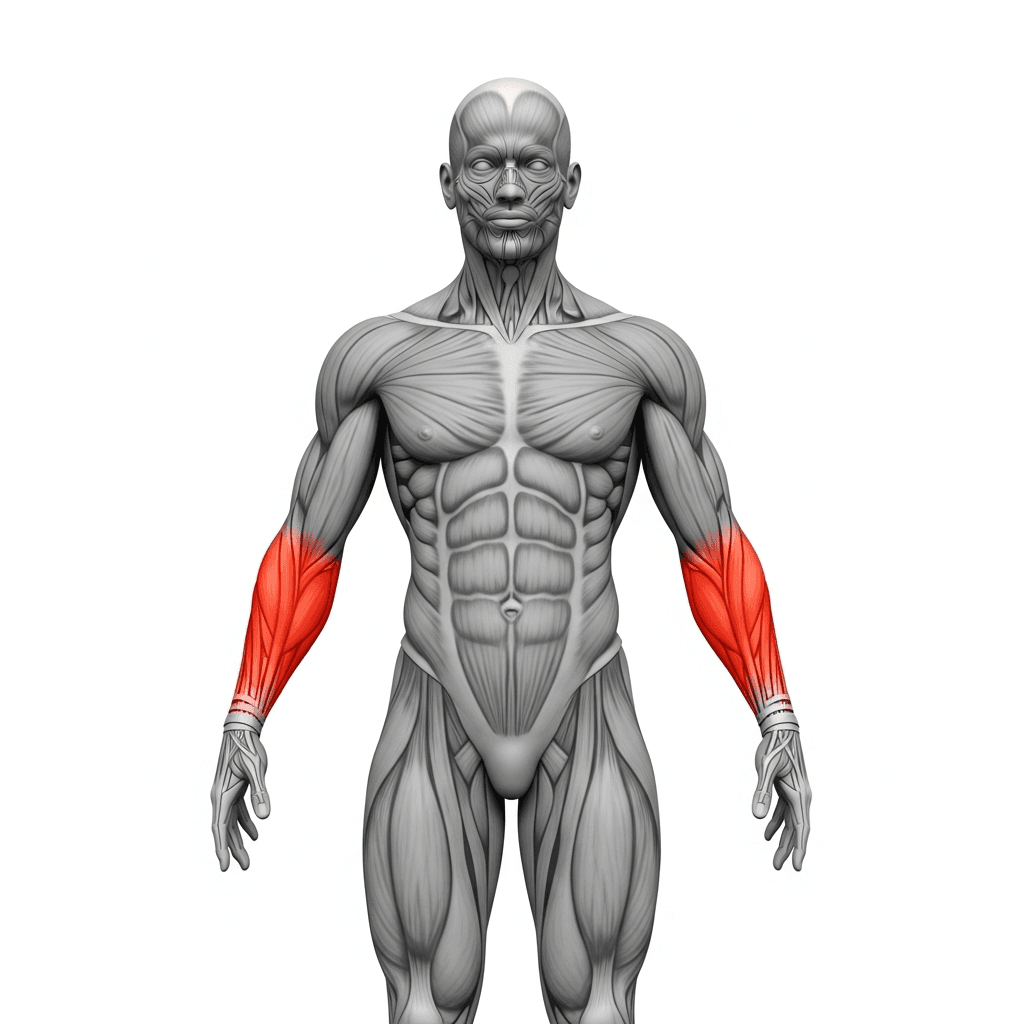
Secondary Muscles
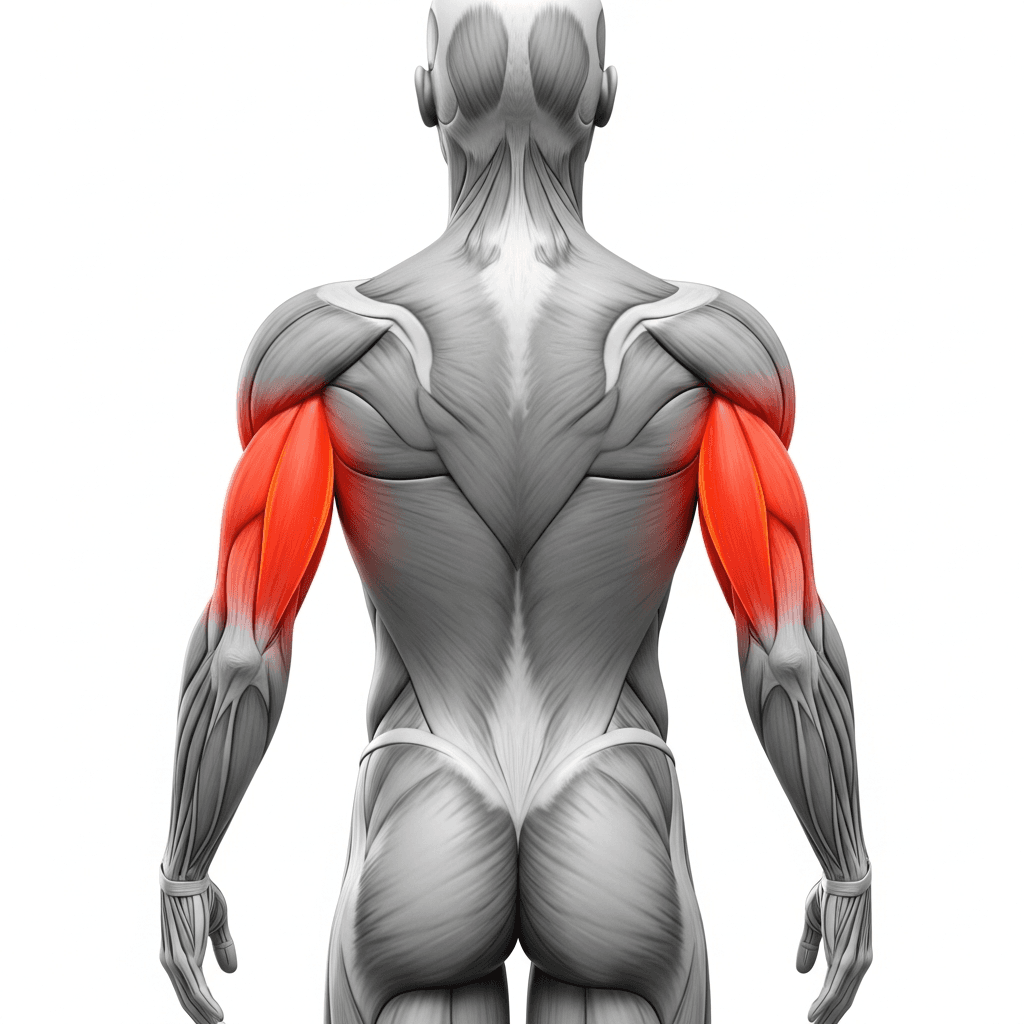
Triceps Brachii (Triceps) - The triceps keep the elbows locked in full extension throughout the movement, preventing any arm bend that would compromise the straight-arm position.
Rhomboids & Upper Trapezius (Upper Back) - The upper back muscles stabilize the scapulae against the ribcage and maintain shoulder positioning as the body lowers through the full range of motion.
Serratus Anterior (Serratus Anterior) - The serratus anterior protracts and upwardly rotates the scapulae to maintain a stable overhead shoulder position while supporting full bodyweight.
Iliopsoas (Hip Flexors) - The hip flexors actively pull the knees toward the chest to maintain the compressed tuck position throughout the descent.
Forearm Flexors & Extensors (Forearms) - The forearms and wrist flexors balance the body through constant micro-adjustments of finger and palm pressure against the floor.
Trapezius (Trapezius) - The trapezius muscles elevate and stabilize the shoulder girdle, helping maintain active shoulders and preventing the body from sinking into the joints during the descent.
Benefits of Negative Handstand To Tuck
- Builds straight-arm pressing strength in the shoulders, which is the exact strength pattern required for handstand press progressions
- Develops deep core compression under load, training the ability to hold a tight tuck while inverted and under tension
- Trains eccentric shoulder control through a full overhead range of motion, which builds strength faster than concentric-only handstand work
- Improves balance awareness and weight-shifting ability in the handstand position, directly transferring to freestanding handstand stability
- Strengthens the serratus anterior and scapular stabilizers in an overhead loaded position, protecting the shoulder joint during all pressing and handstand skills
Who Is This Exercise For?
You should be able to hold a freestanding or wall-assisted handstand for at least 15 seconds with locked arms and active shoulders before attempting this movement. A solid tuck handstand hold of 5 to 10 seconds is also required, as you need the compression strength to keep your knees tight to your chest while inverted. If you cannot maintain straight arms overhead under load or lack basic handstand balance, work on handstand holds and shoulder strength first.
Common Mistakes to Avoid
Bending the arms during the descent: Lock your elbows completely and keep them locked throughout the entire movement. Bent arms shift the load from the shoulders to the triceps and remove the straight-arm strength stimulus that makes this exercise valuable.
Rushing the lowering phase: Aim for a minimum 5-second descent from tuck to floor. If you cannot control the speed, you are not strong enough yet and should spend more time on tuck handstand holds before adding the negative.
Loose tuck with knees far from chest: Actively compress your core and pull your knees as close to your chest as possible throughout the entire descent. A loose tuck makes the lever longer, increases the load on the shoulders beyond what you can control, and removes the compression training benefit.
Not leaning forward enough: Shift your shoulders visibly past your fingertips as you descend. Without the forward lean, your hips drift behind you and you lose balance backward, making a controlled descent impossible.
Variations & Progressions
Wall-Assisted Negative Handstand To Tuck
Perform the movement with your back or chest facing a wall for balance support. This removes the balance demand and lets you focus entirely on building the shoulder and compression strength needed for the freestanding version.
Negative Handstand To Straddle
Instead of tucking, lower with your legs in a wide straddle position. The longer lever arm of open legs demands significantly more shoulder strength and compression control through the descent.
Negative Handstand To Full Pike
Lower with legs fully extended and together in a pike position. This is the hardest negative variation because the legs are at their longest lever, requiring maximum shoulder strength and hamstring flexibility.