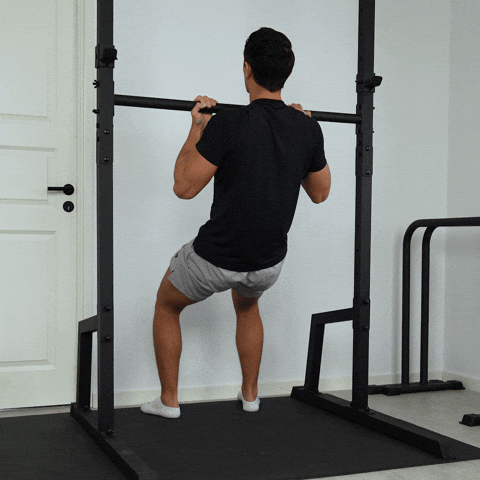
Seated Chin Up Hold
The Seated Chin Up Hold is an excellent exercise for building upper body strength, particularly targeting the biceps, back, and shoulders. This exercise is performed while seated on the floor, using a low bar or a sturdy surface to grip. The key is to maintain proper form throughout the hold to maximize effectiveness.

How To Do Seated Chin Up Hold
The Seated Chin Up Hold is an excellent exercise for building upper body strength, particularly targeting the biceps, back, and shoulders. This exercise is performed while seated on the floor, using a low bar or a sturdy surface to grip. The key is to maintain proper form throughout the hold to maximize effectiveness.
Step-by-Step Guide to Properly Execute Seated Chin Up Hold
Starting Position
Begin by sitting on the floor with your buttocks flat against the ground. Position a low bar or sturdy surface above you, ensuring it is at a height that allows you to reach it comfortably. Grip the bar with your palms facing towards you (supinated grip), hands shoulder-width apart. Your legs should be extended in front of you, and your feet should be flat on the ground.
Engaging Your Core
Before you begin the hold, engage your core muscles by tightening your abdominal area. This will help stabilize your body and maintain proper posture throughout the exercise. Keep your shoulders down and back, avoiding any hunching.
Pulling Up
With your grip secure and core engaged, pull your body upwards towards the bar. Focus on using your biceps and back muscles to lift yourself. Aim to bring your chin above the bar while keeping your elbows close to your body. This is the active phase of the hold.
Holding the Position
Once your chin is above the bar, hold this position for the desired duration. Keep your body steady, avoiding swinging or using momentum. Maintain a strong grip and continue to engage your core to support your body weight.
Lowering Down
After holding the position for the set time, slowly lower your body back down to the starting position. Control the descent to avoid any sudden drops, which can strain your muscles. Ensure your feet remain flat on the ground as you return to the seated position.
Tips for Proper Form
Throughout the exercise, focus on keeping your back straight and shoulders relaxed. Avoid leaning back excessively or letting your legs lift off the ground. Consistent practice will help improve your strength and form over time.
Seated Chin Up Hold Workout Plan for All Levels
- Beginner: 2 sets of 10-15 seconds hold, 1 minute rest, 2 times per week.
- Intermediate: 3 sets of 20-30 seconds hold, 1 minute rest, 3 times per week.
- Advanced: 4 sets of 30-45 seconds hold, 1 minute rest, 4 times per week.
What Are The Benefits Of Seated Chin Up Hold
- Builds upper body strength, particularly in the biceps and back.
- Improves grip strength, which is essential for various exercises.
- Enhances core stability and overall body control.
- Prepares the body for more advanced pulling exercises, such as pull-ups and chin-ups.
Common Mistakes to Avoid
- Hunching the shoulders: Keep shoulders down and back to avoid strain.
- Using momentum: Focus on controlled movements rather than swinging.
- Not engaging the core: Always tighten your core to maintain stability.
- Letting legs lift off the ground: Keep feet flat to ensure proper form.
Follow these steps and tips to master Seated Chin Up Hold with proper form and efficiency.
How To Do Seated Chin Up Hold
Step-by-Step Guide to Properly Execute Seated Chin Up Hold
Starting Position
Begin by sitting on the floor with your buttocks flat against the ground. Position a low bar or sturdy surface above you, ensuring it is at a height that allows you to reach it comfortably. Grip the bar with your palms facing towards you (supinated grip), hands shoulder-width apart. Your legs should be extended in front of you, and your feet should be flat on the ground.
Engaging Your Core
Before you begin the hold, engage your core muscles by tightening your abdominal area. This will help stabilize your body and maintain proper posture throughout the exercise. Keep your shoulders down and back, avoiding any hunching.
Pulling Up
With your grip secure and core engaged, pull your body upwards towards the bar. Focus on using your biceps and back muscles to lift yourself. Aim to bring your chin above the bar while keeping your elbows close to your body. This is the active phase of the hold.
Holding the Position
Once your chin is above the bar, hold this position for the desired duration. Keep your body steady, avoiding swinging or using momentum. Maintain a strong grip and continue to engage your core to support your body weight.
Lowering Down
After holding the position for the set time, slowly lower your body back down to the starting position. Control the descent to avoid any sudden drops, which can strain your muscles. Ensure your feet remain flat on the ground as you return to the seated position.
Tips for Proper Form
Throughout the exercise, focus on keeping your back straight and shoulders relaxed. Avoid leaning back excessively or letting your legs lift off the ground. Consistent practice will help improve your strength and form over time.
Seated Chin Up Hold Workout Plan for All Levels
- Beginner: 2 sets of 10-15 seconds hold, 1 minute rest, 2 times per week.
- Intermediate: 3 sets of 20-30 seconds hold, 1 minute rest, 3 times per week.
- Advanced: 4 sets of 30-45 seconds hold, 1 minute rest, 4 times per week.
What Are The Benefits Of Seated Chin Up Hold
- Builds upper body strength, particularly in the biceps and back.
- Improves grip strength, which is essential for various exercises.
- Enhances core stability and overall body control.
- Prepares the body for more advanced pulling exercises, such as pull-ups and chin-ups.
Common Mistakes to Avoid
- Hunching the shoulders: Keep shoulders down and back to avoid strain.
- Using momentum: Focus on controlled movements rather than swinging.
- Not engaging the core: Always tighten your core to maintain stability.
- Letting legs lift off the ground: Keep feet flat to ensure proper form.
Follow these steps and tips to master Seated Chin Up Hold with proper form and efficiency.
How to Do Seated Chin Up Hold
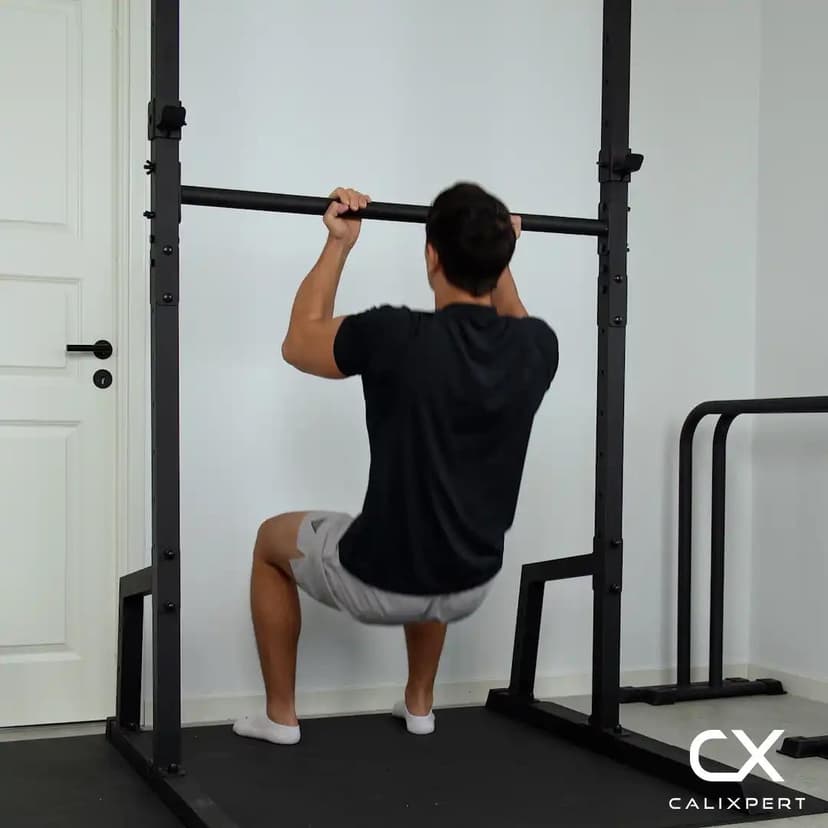
1. Position Yourself Under the Bar
Sit directly underneath a low bar so you can reach it comfortably from a seated position. If the bar is too high to grip while seated, lower it until your hands can wrap around it without lifting off the ground. Your torso should be upright and centered under the bar.
Sit straight underneath, not in front
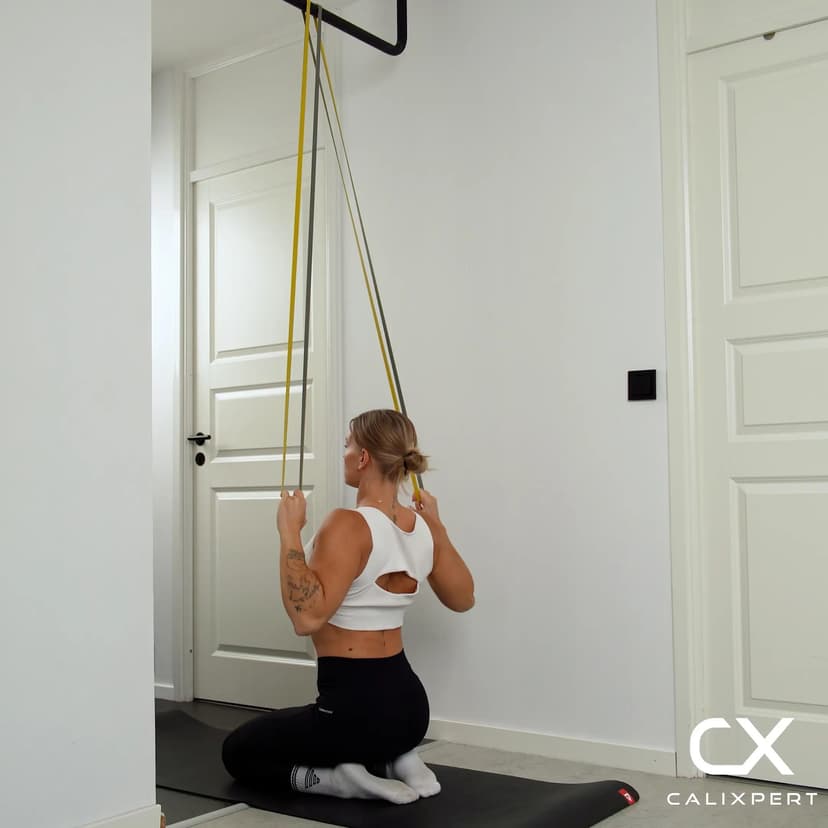
2. Set Your Underhand Grip
Grab the bar with an underhand (supinated) grip, palms facing toward you, at roughly shoulder width. Wrap your thumbs fully around the bar so you have a secure grip. Never rest your thumbs on top of the bar, as this weakens your hold and puts unnecessary strain on the fingers.
Thumbs always around the bar
3. Place Your Feet Wide and Forward
Position your feet slightly wider than shoulder width apart and slide them forward so they are in front of your hips, not directly beneath you. Keep your feet flat on the ground. This foot placement gives you a stable base and lets you control how much assistance your legs provide during the hold.
Feet wide and out in front
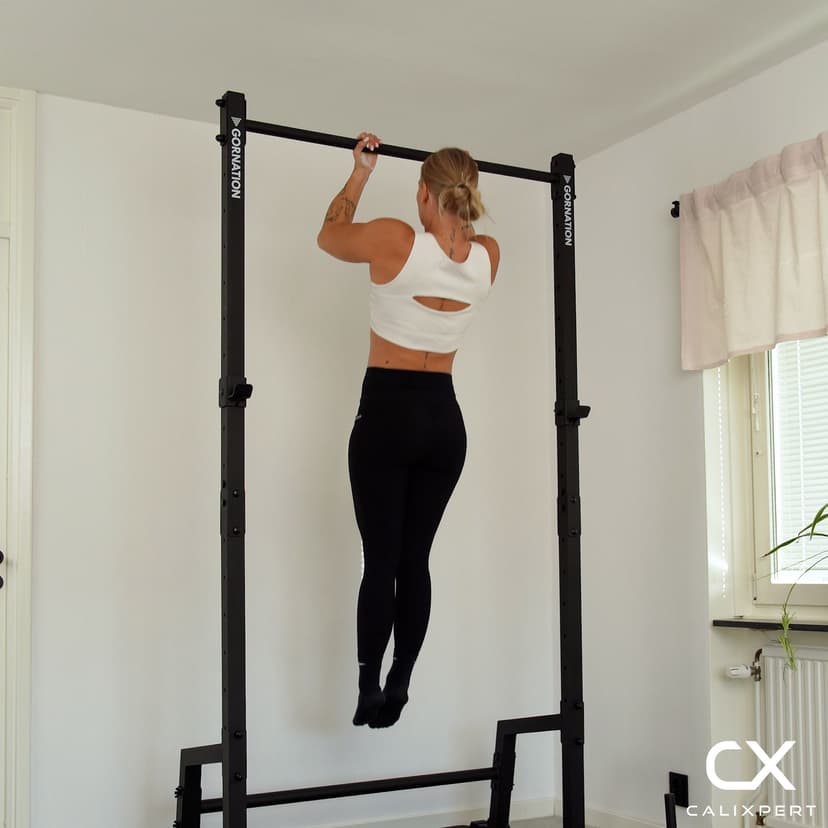
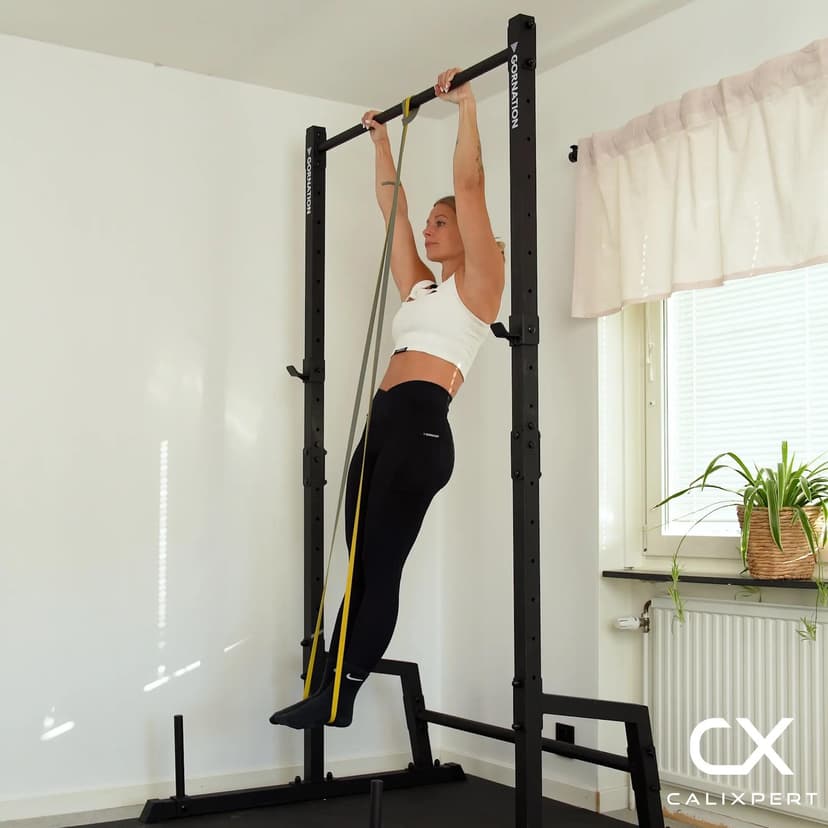
4. Pull to the Top Position
Drive your elbows backward and pull your body up toward the bar as if performing a chin-up. Use your legs for partial support but focus on generating force from your back and biceps. Continue pulling until your chin clears above the bar and your chest is close to it.
Drive elbows back, chin over the bar
5. Hold and Squeeze the Back
Once your chin is above the bar, hold this top position and actively squeeze your shoulder blades together. Keep your elbows pulled back behind you rather than letting them drift forward. Maintain tension through your entire back and arms for the full duration of the hold.
Squeeze the back, hold the position
6. Lower With Control
After holding for the target duration, slowly lower yourself back to the seated starting position. Resist gravity on the way down rather than dropping. Reset your grip and body position before beginning the next rep.
Slow descent, no dropping
Most people treat this as a bicep exercise and forget about the back entirely. The hold only becomes effective when you actively squeeze your shoulder blades together and drive the elbows behind you at the top. If you feel it mostly in your arms, you are holding the position but not doing the exercise.
Muscles Worked During Seated Chin Up Hold
Secondary Muscles:

Primary Muscles
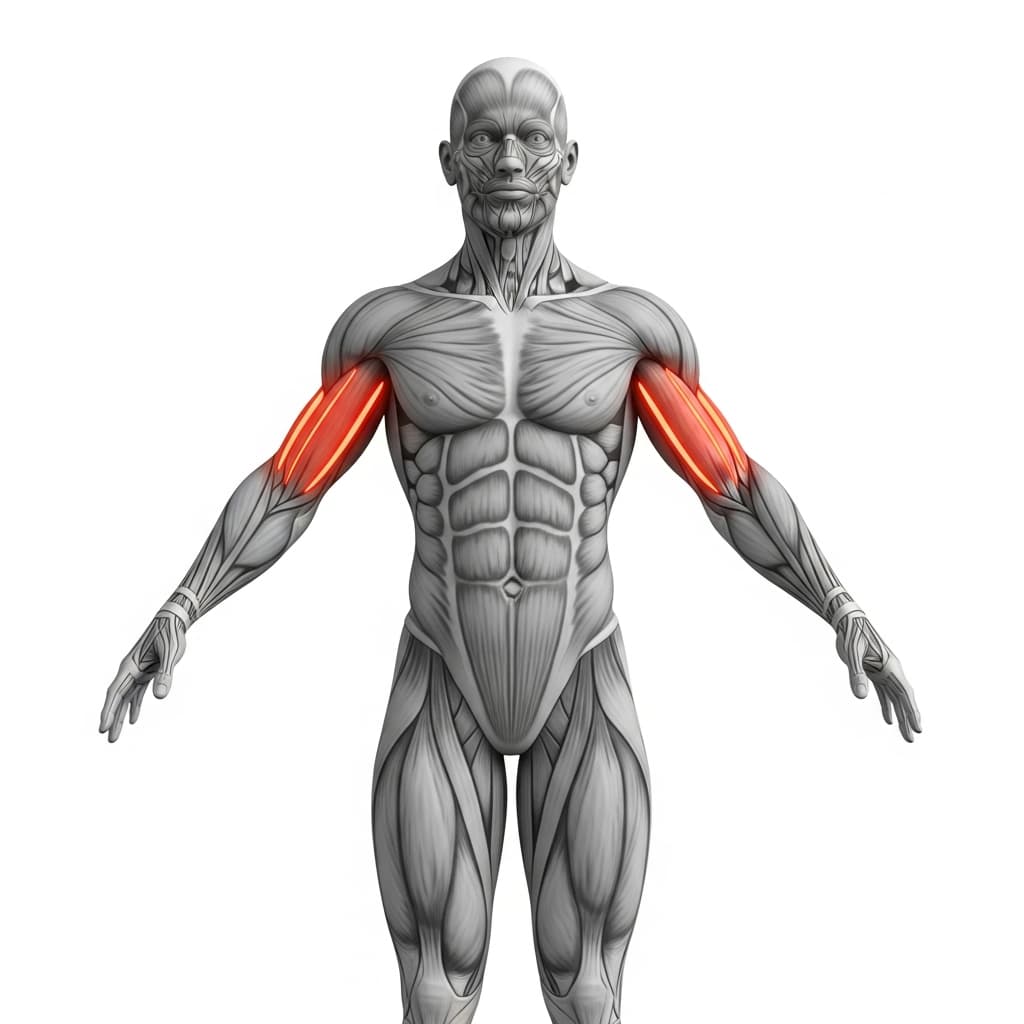
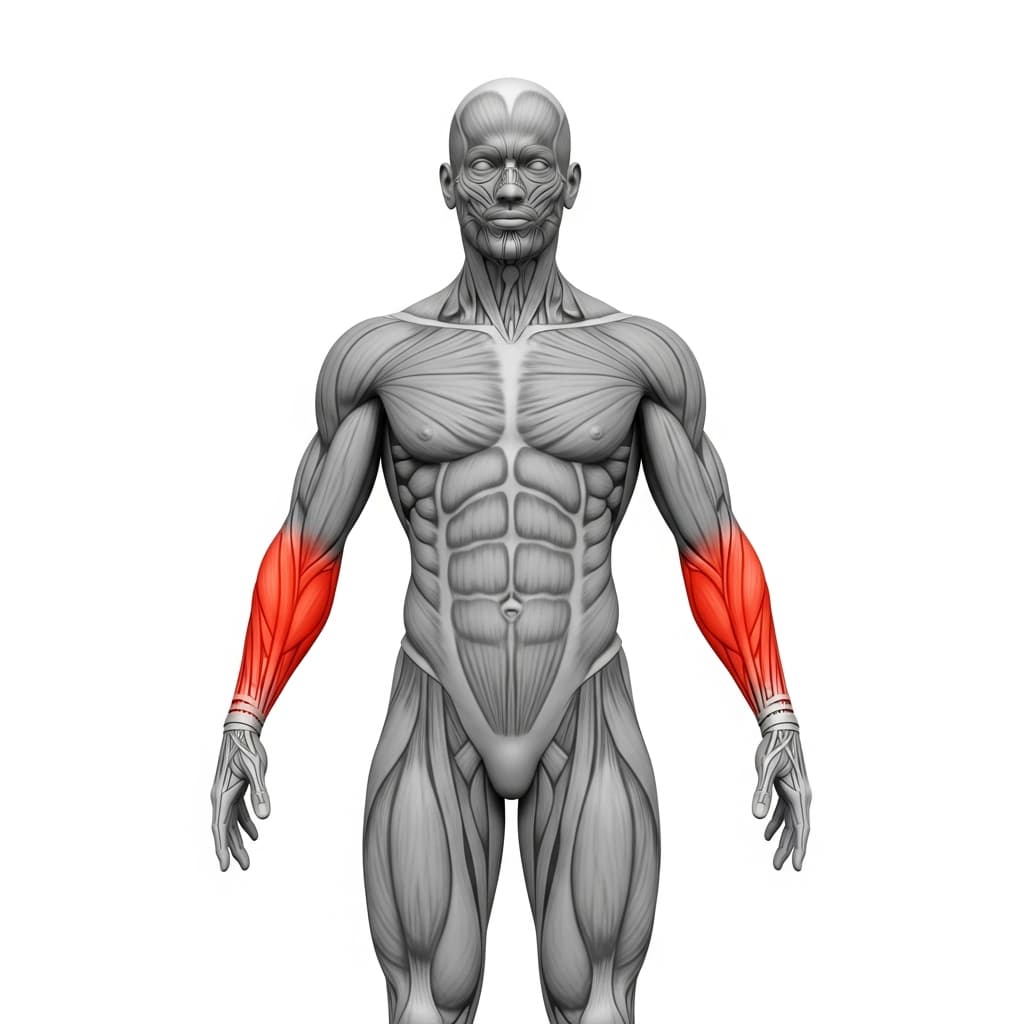
Biceps Brachii (Biceps) - The biceps maintain elbow flexion throughout the isometric hold, keeping the chin above the bar under sustained load.
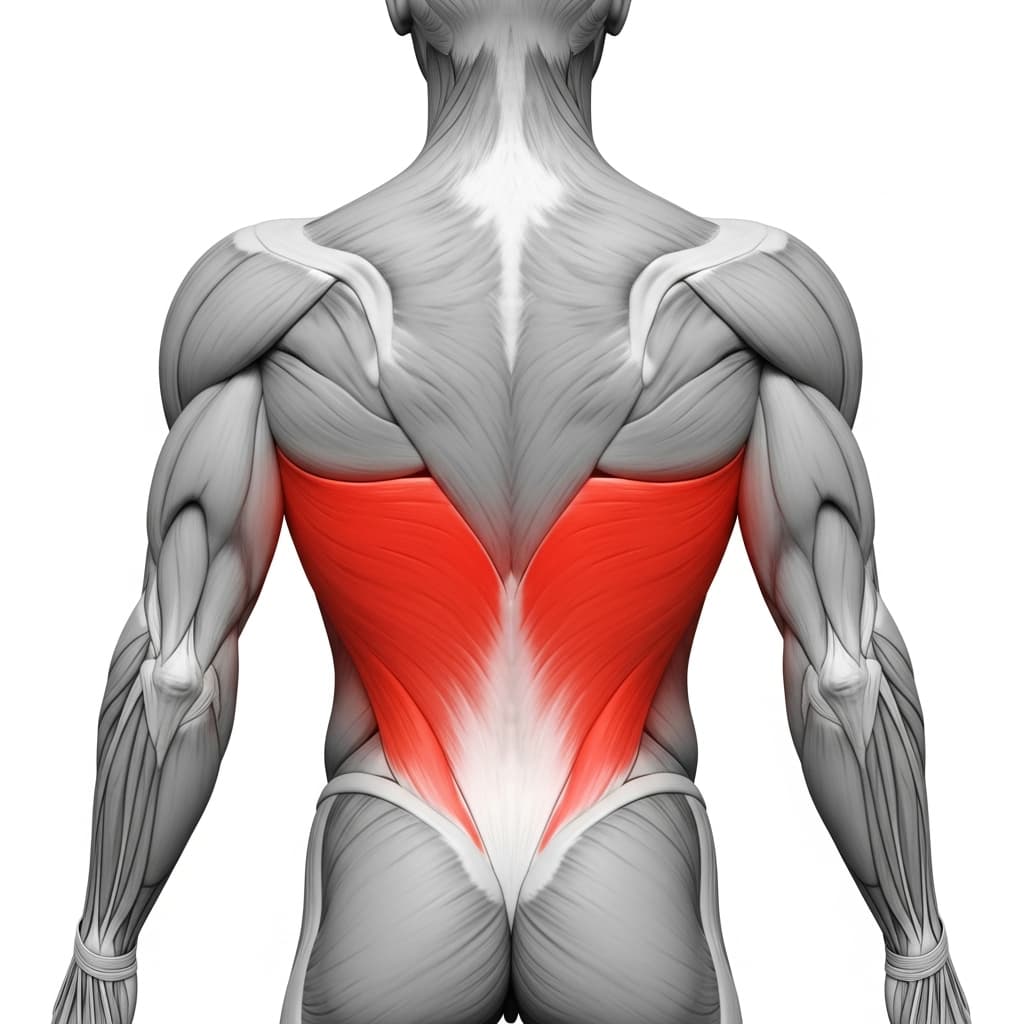
Latissimus Dorsi (Lats) - The lats hold the shoulders in adduction and extension, pulling the elbows backward and keeping the torso close to the bar during the hold.
Secondary Muscles
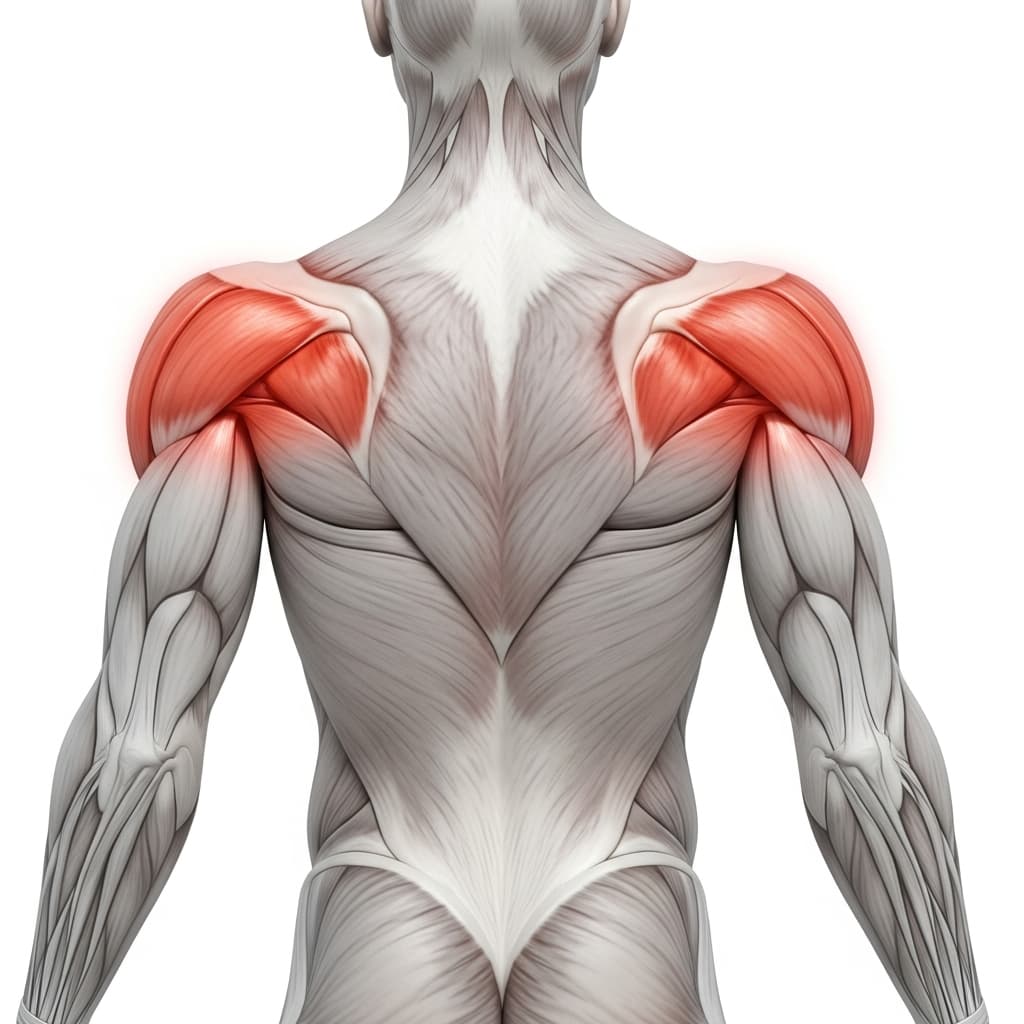
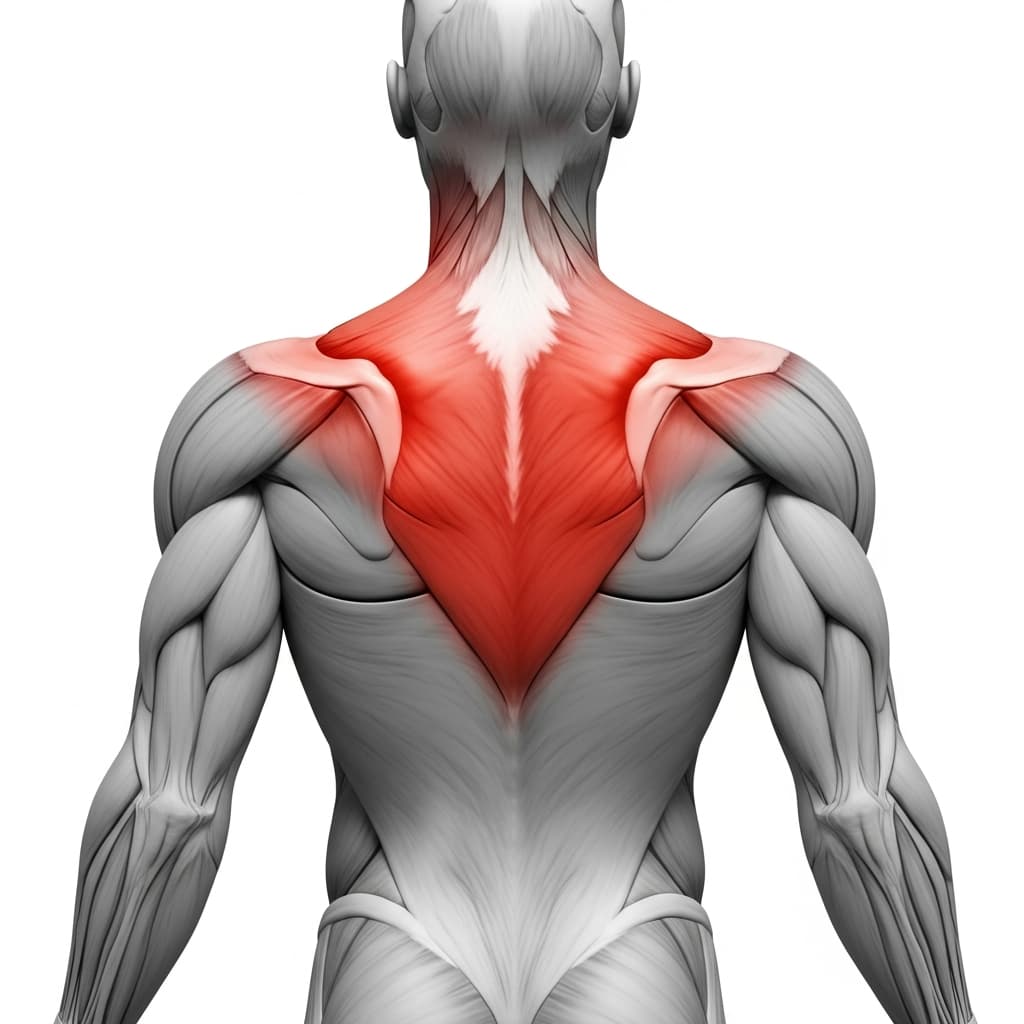
Rhomboids & Upper Trapezius (Upper Back) - The rhomboids and mid-traps retract the scapulae throughout the hold, maintaining the chest-to-bar position and preventing the shoulders from rounding forward.
Posterior Deltoid (Rear Deltoid) - The rear deltoids assist in pulling the elbows backward and stabilizing the shoulder joint in the top position of the hold.
Forearm Flexors & Extensors (Forearms) - The forearm flexors maintain a secure grip on the bar for the entire duration of the hold, working under sustained isometric tension.
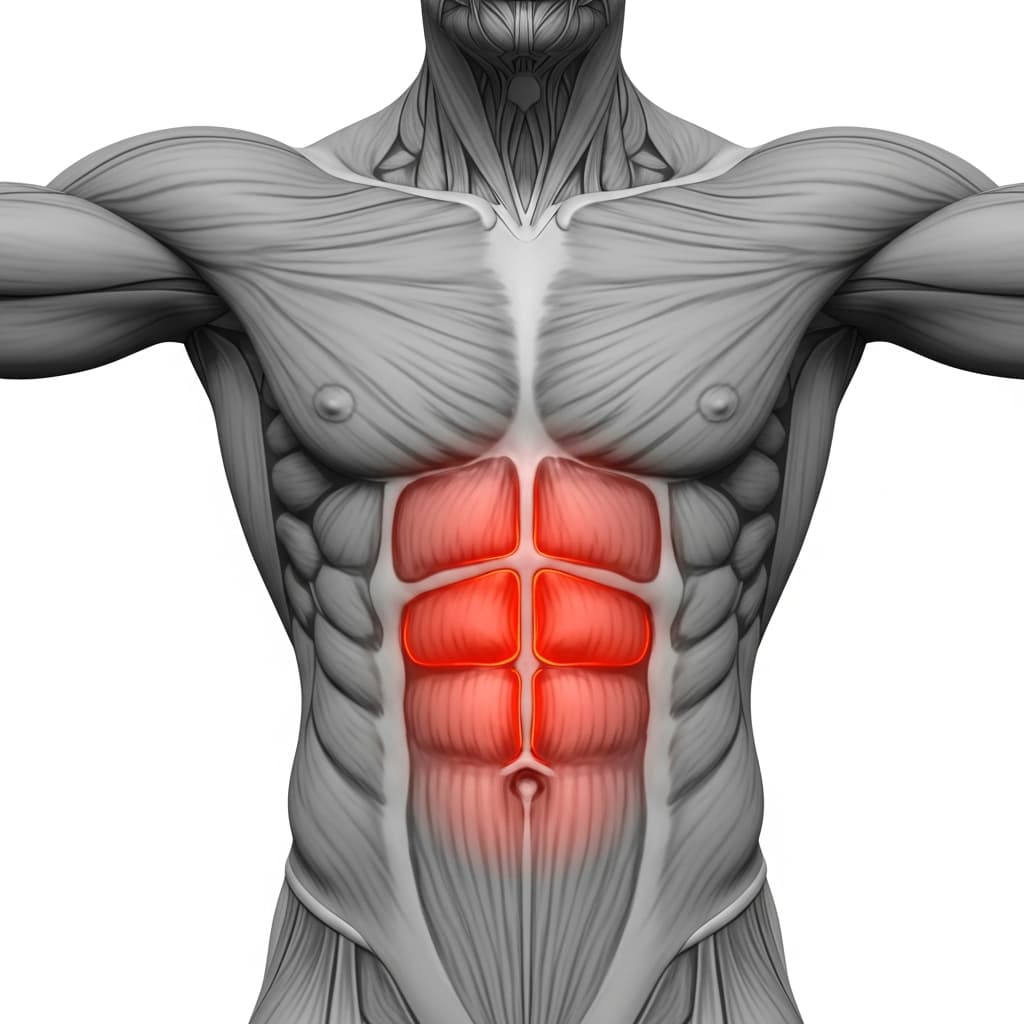
Rectus Abdominis (Abs) - The abdominals brace the torso and prevent excessive arching of the lower back during the hold, keeping the body stable under the bar.
Trapezius (Trapezius) - The lower and middle trapezius fibers depress and retract the scapulae, supporting the shoulder position and preventing the shoulders from shrugging upward.
Benefits of Seated Chin Up Hold
- Builds the isometric pulling strength at the top range of motion that most beginners lack when working toward their first chin-up
- Develops bicep and lat activation patterns in a low-risk, foot-assisted position that reduces injury potential
- Strengthens the scapular retractors through sustained contraction, which directly transfers to better form on all pulling exercises
- Improves grip endurance under load, preparing the forearms for longer sets of chin-ups and pull-ups
Who Is This Exercise For?
You should be able to grip a bar with a supinated (underhand) grip and hold it comfortably for at least 10 seconds before attempting this exercise. If your grip fails quickly or your shoulders feel unstable when hanging from a bar, spend a few weeks building dead hang endurance and basic scapular control first.
Common Mistakes to Avoid
Thumbs resting on top of the bar: Always wrap your thumbs fully around the bar in a closed grip. An open thumb grip reduces pulling power and makes it harder to maintain a secure hold at the top.
Not squeezing the back at the top: Actively retract your shoulder blades and drive your elbows backward during the hold. Without this squeeze, the biceps carry almost all the load and the back muscles never learn to engage properly.
Feet positioned too close to the body: Slide your feet forward so they are in front of your hips, not directly underneath you. When the feet are too close, the legs do most of the work and the upper body receives very little stimulus.
Chin jutting forward instead of pulling higher: Your chin should clear the bar as a result of pulling effort, not by craning your neck forward. Keep your neck neutral and focus on lifting your chest toward the bar.