Straddle Pike Push Ups
Straddle pike push-ups are a bodyweight pressing exercise that loads the shoulders and triceps in a near-vertical pressing angle by combining a pike position with a wide leg stance. The straddle stance lowers the hips closer to the ground, which reduces the flexibility demand and makes the movement more accessible than a standard pike push-up while still training overhead pressing strength. Performed with correct head path and scapular control, straddle pike push-ups build the specific shoulder strength and body positioning needed to progress toward handstand push-ups.

Straddle pike push-ups are a bodyweight pressing exercise that loads the shoulders and triceps in a near-vertical pressing angle by combining a pike position with a wide leg stance. The straddle stance lowers the hips closer to the ground, which reduces the flexibility demand and makes the movement more accessible than a standard pike push-up while still training overhead pressing strength. Performed with correct head path and scapular control, straddle pike push-ups build the specific shoulder strength and body positioning needed to progress toward handstand push-ups.
How to Do Straddle Pike Push Ups
1. Set Your Hand Position
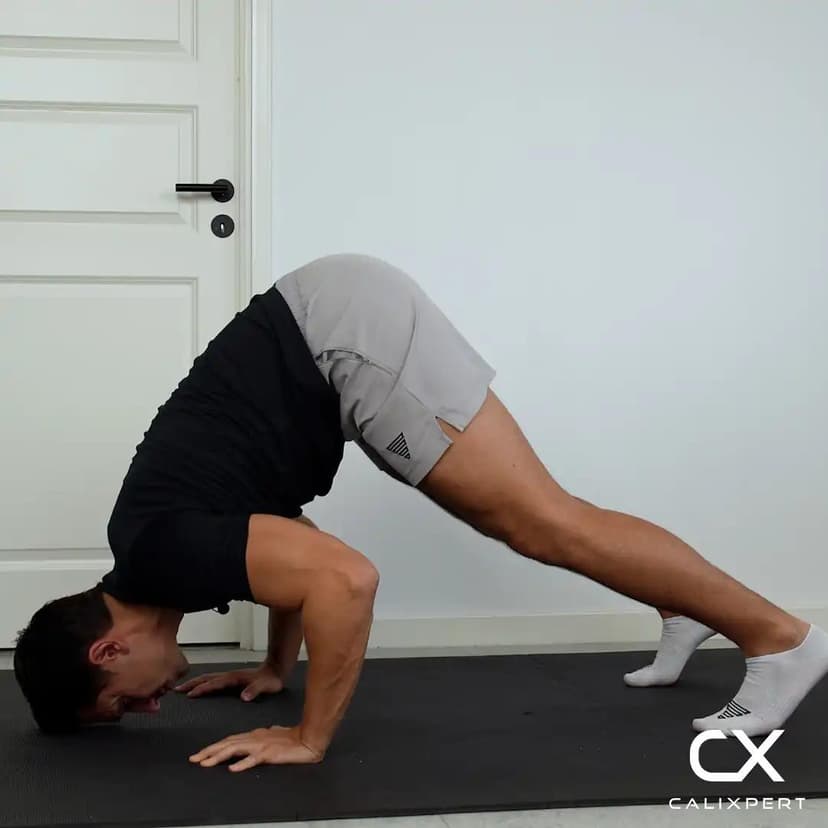
Place your hands on the floor slightly wider than shoulder-width apart with fingers pointing forward. Spread your fingers wide and press evenly through your entire palm. This width gives your head a clear path to travel forward during the descent without your arms blocking the movement.
Hands just outside shoulder width
2. Get Into the Straddle Pike
Step your feet wide into a straddle stance and walk them forward until your hips are stacked high above your shoulders. Your body should form an inverted V shape with your weight shifted back toward your feet, not forward over your hands. Keep your arms fully locked out and your legs as straight as possible. The wider the straddle, the easier the exercise will be.
Hips high, weight shifted back
3. Lower Your Head in Front
Bend your elbows and lower your head toward the floor, directing it in front of your hands rather than between them. Your head, left hand, and right hand should form a triangle shape at the bottom of the movement. Keep your elbows tracking at roughly a 45-degree angle, not flaring out to the sides or collapsing inward.
Head in front, forming a triangle
4. Touch Down With Control
Continue lowering until the top of your head lightly touches or nearly touches the floor. Keep your hips elevated and your core braced throughout the descent. Do not let your torso collapse forward into a regular push-up position.
Light touch, hips stay high
5. Press Back to Start
Push through your palms to reverse the movement, driving your body back and up to the starting position with arms fully extended. The pressing direction should feel like you are pushing yourself backward toward your feet, not straight up. Reset your scapula and confirm your hips are still stacked high before starting the next rep.
Push back, not just up
Most people fail this exercise because they treat it like a push-up with their hips in the air. The key is the head path. Your head needs to travel in front of your hands on the way down, not between them. Once you nail that triangle shape at the bottom and start pressing yourself backward instead of just up, you will feel the shoulders working completely differently.
Muscles Worked During Straddle Pike Push Ups
Primary Muscles:

Secondary Muscles:
Primary Muscles
Anterior Deltoid (Front Deltoid) - The anterior deltoids are the primary movers, driving the near-vertical pressing action as you push your body back up from the bottom of the pike position.
Secondary Muscles
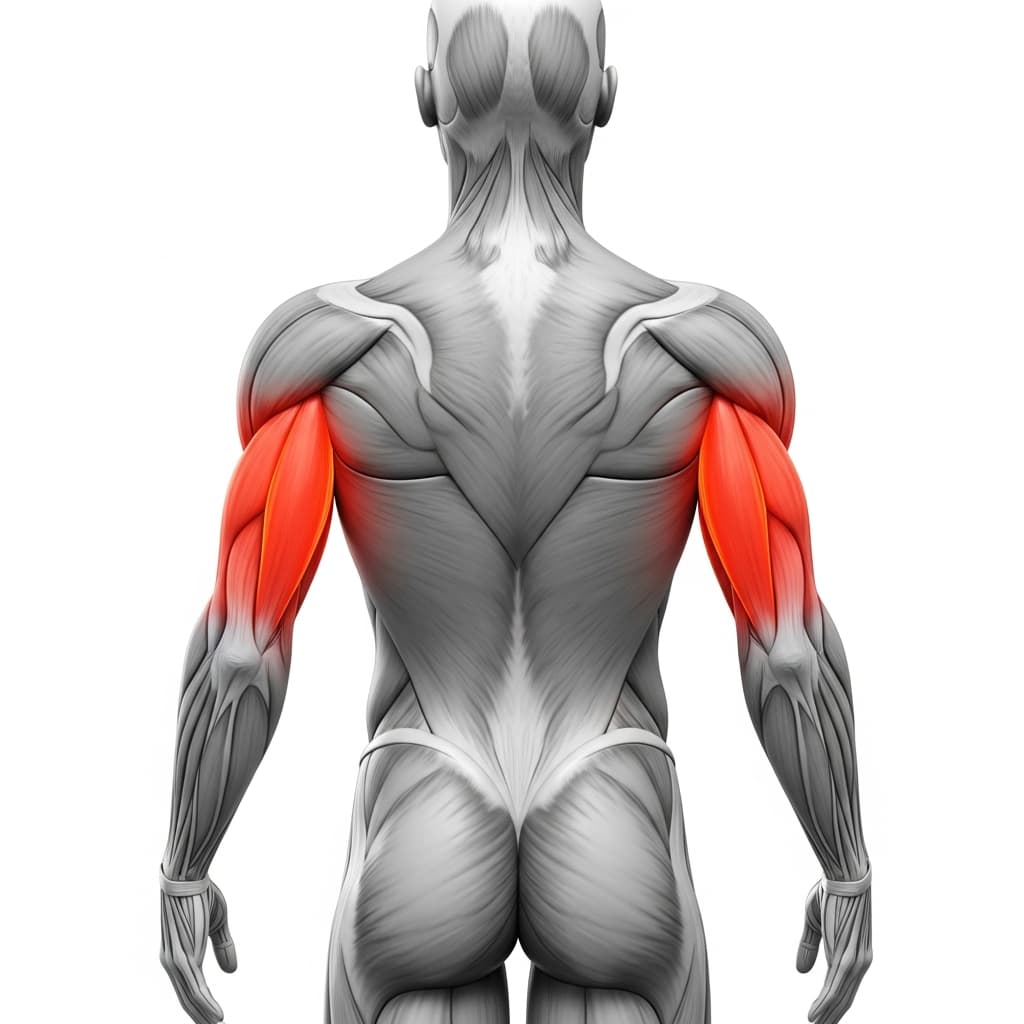
Triceps Brachii (Triceps) - The triceps extend the elbows during the pressing phase, working alongside the deltoids to lock out the arms at the top of each rep.
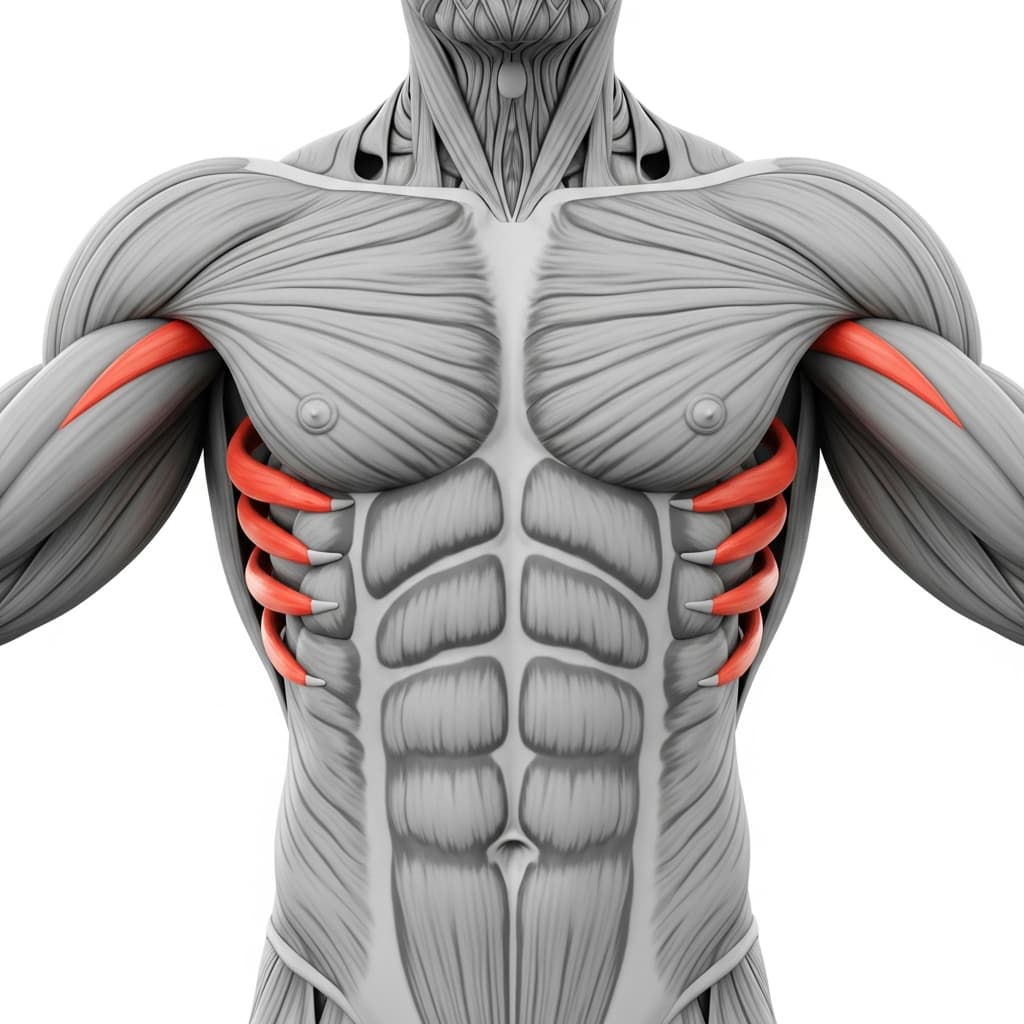
Serratus Anterior (Serratus Anterior) - The serratus anterior protracts and upwardly rotates the scapula during the press, stabilizing the shoulder blade against the ribcage throughout the overhead pressing motion.
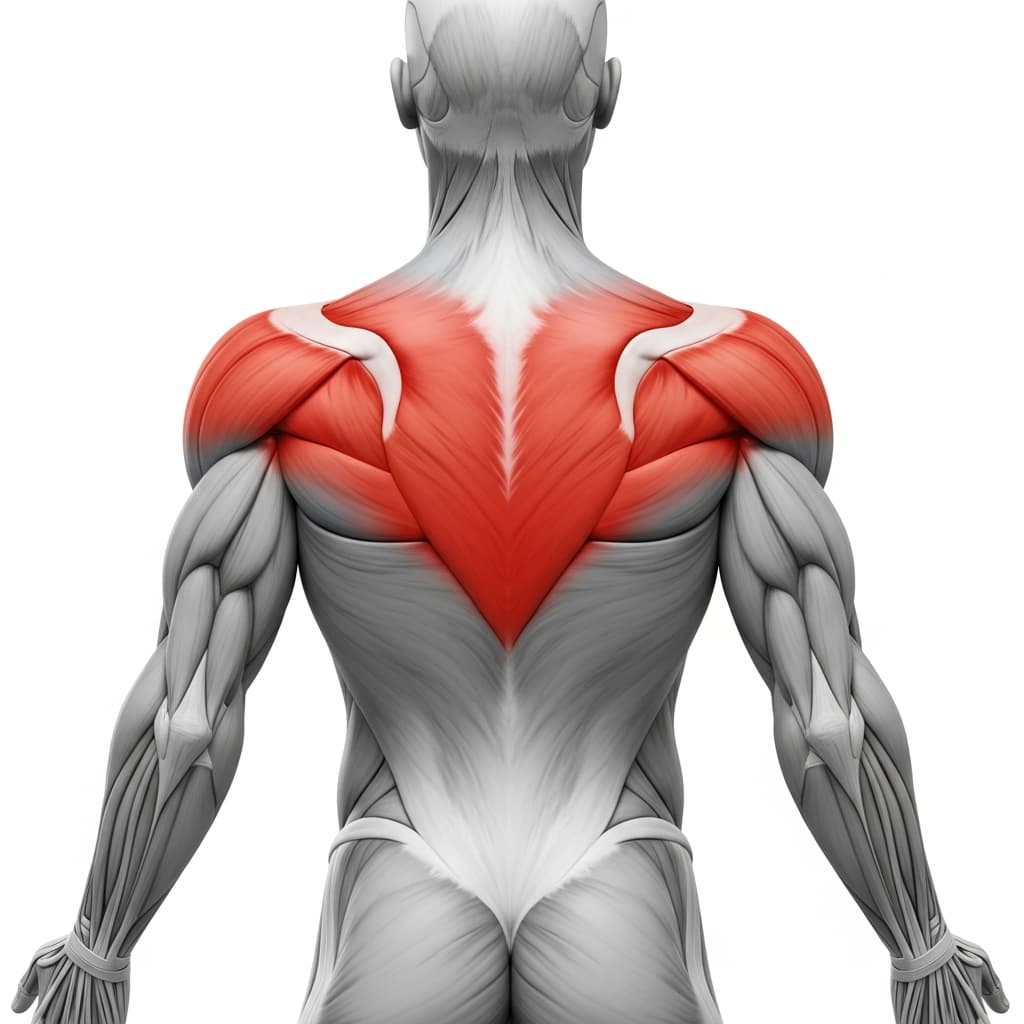
Rhomboids & Upper Trapezius (Upper Back) - The upper back muscles stabilize the scapulae and control their movement during both the lowering and pressing phases, preventing the shoulders from collapsing forward under load.
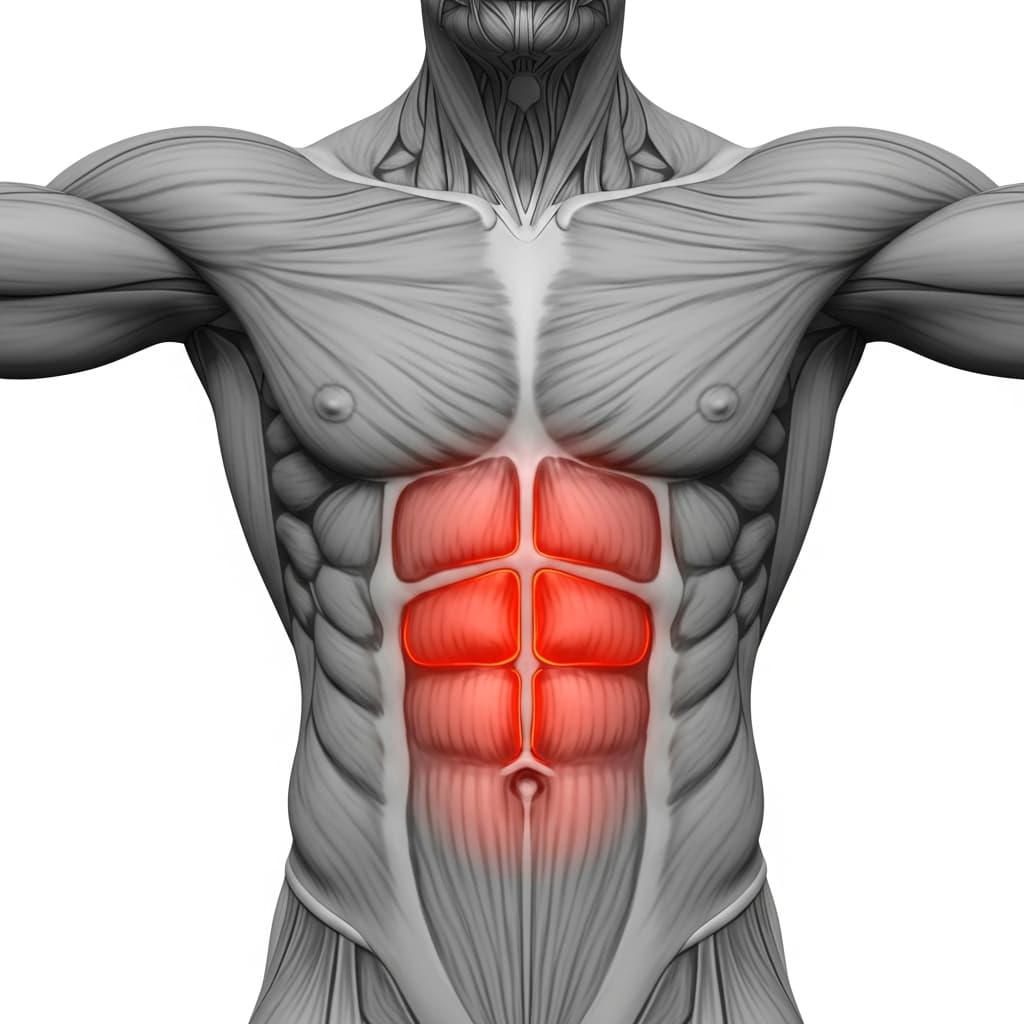
Rectus Abdominis (Abs) - The abdominals brace the torso and maintain the pike position by preventing the hips from sagging toward the floor throughout each rep.
Benefits of Straddle Pike Push Ups
- Builds overhead pressing strength in the anterior deltoids using only bodyweight, directly preparing the shoulder girdle for handstand push-ups
- Trains the serratus anterior and upper trapezius to stabilize the scapula under load, which is critical for safe overhead pressing and handstand work
- Requires zero equipment and can be performed anywhere with enough floor space for a straddle stance
- Develops pressing endurance and shoulder stability at angles that barbell and dumbbell pressing cannot replicate due to the closed-chain nature of the movement
Who Is This Exercise For?
You should be able to perform at least 10 clean regular push-ups and hold a downward dog position comfortably for 20 seconds before attempting straddle pike push-ups. Basic shoulder mobility that allows your arms to reach fully overhead without lower back compensation is also required. If you cannot hold a pike position with straight arms and elevated hips, work on shoulder flexibility and standard push-up strength first.
Common Mistakes to Avoid
Lowering the head between the hands: Your head must travel in front of your hands on the way down, forming a triangle with your two hands. If your head drops straight between your hands, you lose the correct pressing angle and reduce shoulder activation.
Turning it into a regular push-up: Keep your hips high and your weight shifted back throughout the entire movement. If your hips drop and your body flattens, you are pressing horizontally instead of vertically, which removes the overhead pressing stimulus.
Lifting the head up instead of pressing back: At the bottom of the movement, press your body backward toward your feet rather than just raising your head off the floor. Simply lifting the head turns the exercise into a neck movement and takes the load off the shoulders.
Bending the legs excessively: Keep your legs as straight as possible throughout the movement. Bending the knees drops the hips and shifts the angle closer to a standard push-up, reducing the overhead pressing demand that makes this exercise valuable.