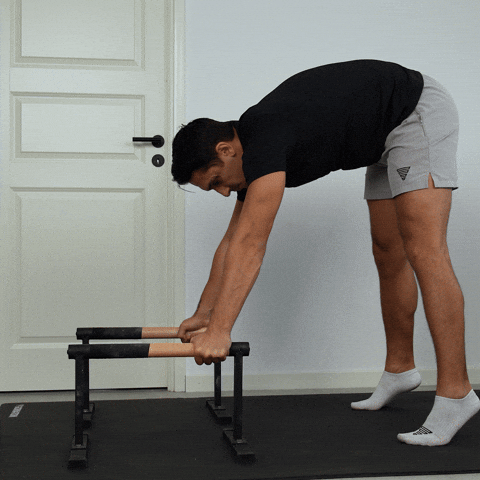
Incline Pike Push Ups
Incline pike push-ups are a shoulder-dominant pressing exercise where your hands are placed on an elevated surface and your body forms an inverted V, targeting the front deltoids, triceps, and upper traps through a vertical pushing pattern. The elevation reduces the load on your shoulders compared to a floor pike push-up, making it the ideal entry point for learning proper pike pressing mechanics. Building clean reps here develops the overhead pressing strength and scapular control required for pike push-ups, wall handstand push-ups, and every advanced pressing skill in calisthenics.
Incline pike push-ups are a shoulder-dominant pressing exercise where your hands are placed on an elevated surface and your body forms an inverted V, targeting the front deltoids, triceps, and upper traps through a vertical pushing pattern. The elevation reduces the load on your shoulders compared to a floor pike push-up, making it the ideal entry point for learning proper pike pressing mechanics. Building clean reps here develops the overhead pressing strength and scapular control required for pike push-ups, wall handstand push-ups, and every advanced pressing skill in calisthenics.
How to Do Incline Pike Push Ups
1. Set Up on the Surface
Place your hands on a stable elevated surface roughly half your height, such as a bench, box, or pair of parallettes. Position your hands just outside shoulder width with your fingers pointing slightly outward to about 11 and 1 o'clock. Wrap your fingers over the edge of the surface for a solid grip. The surface must be completely stable before you load any weight onto it.
Fingers slightly outward, grip locked
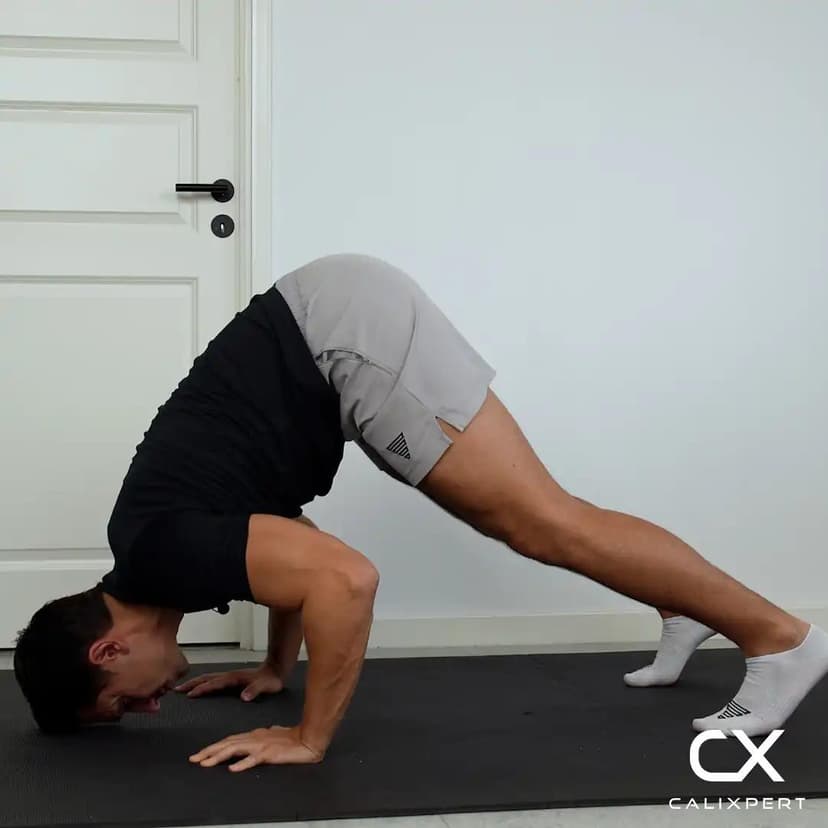
2. Walk Into the Pike Position
Walk your feet in until your hips are stacked as high as possible and your body forms an inverted V. Keep your legs roughly shoulder width apart and rise up onto your toes. Your legs should be straight and your back flat, not rounded. The steeper your hip angle, the more load transfers to your shoulders.
Hips high, up on your toes
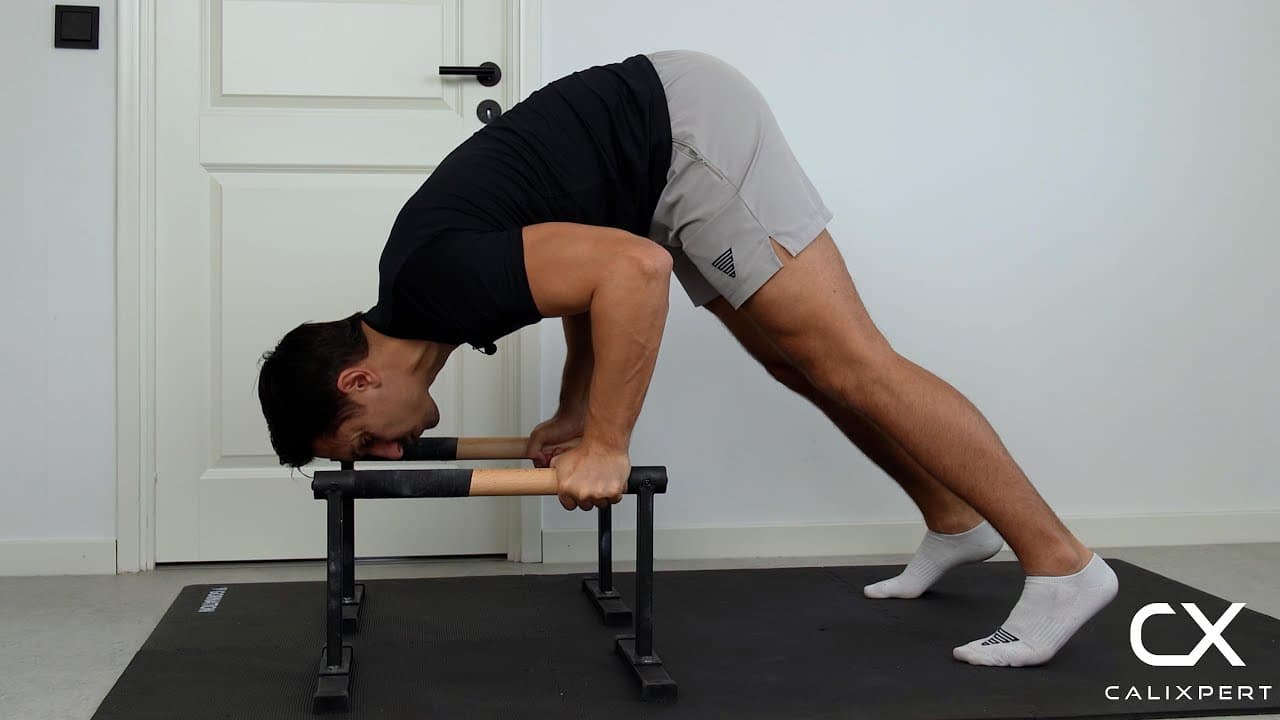
3. Lower Into the Triangle
Bend your elbows and lower your head toward the surface in a controlled descent. Your elbows should flare at roughly 45 degrees from your body, not straight out to the sides. As you descend, your hands and the top of your head should form a triangle shape on the surface. Stop when your elbows reach a 90-degree bend.
Head and hands form a triangle
4. Press Back Up
Drive through your palms and push your body back to the starting position by fully extending your elbows. Focus on pressing the surface away from you rather than lifting your body up. Keep your hips high and your core braced throughout the push so your body stays in the pike position.
Push the surface away from you
5. Reset Before the Next Rep
At the top of each rep, fully lock out your elbows and re-check your hip position. Your hips should still be stacked high with your weight on your toes. If your hips have dropped or your feet have crept backward, walk them back in before starting the next rep.
Lock out fully, hips stay high
Most people fail incline pike push-ups because they treat them like a push-up with their hips raised. The moment you shift your focus to pressing vertically, driving the surface away from your head instead of pushing your chest up, the shoulders engage properly and the movement clicks. If you cannot feel your front delts burning after a set, your hips are too low and you are pressing horizontally.
Muscles Worked During Incline Pike Push Ups
Primary Muscles:
Secondary Muscles:

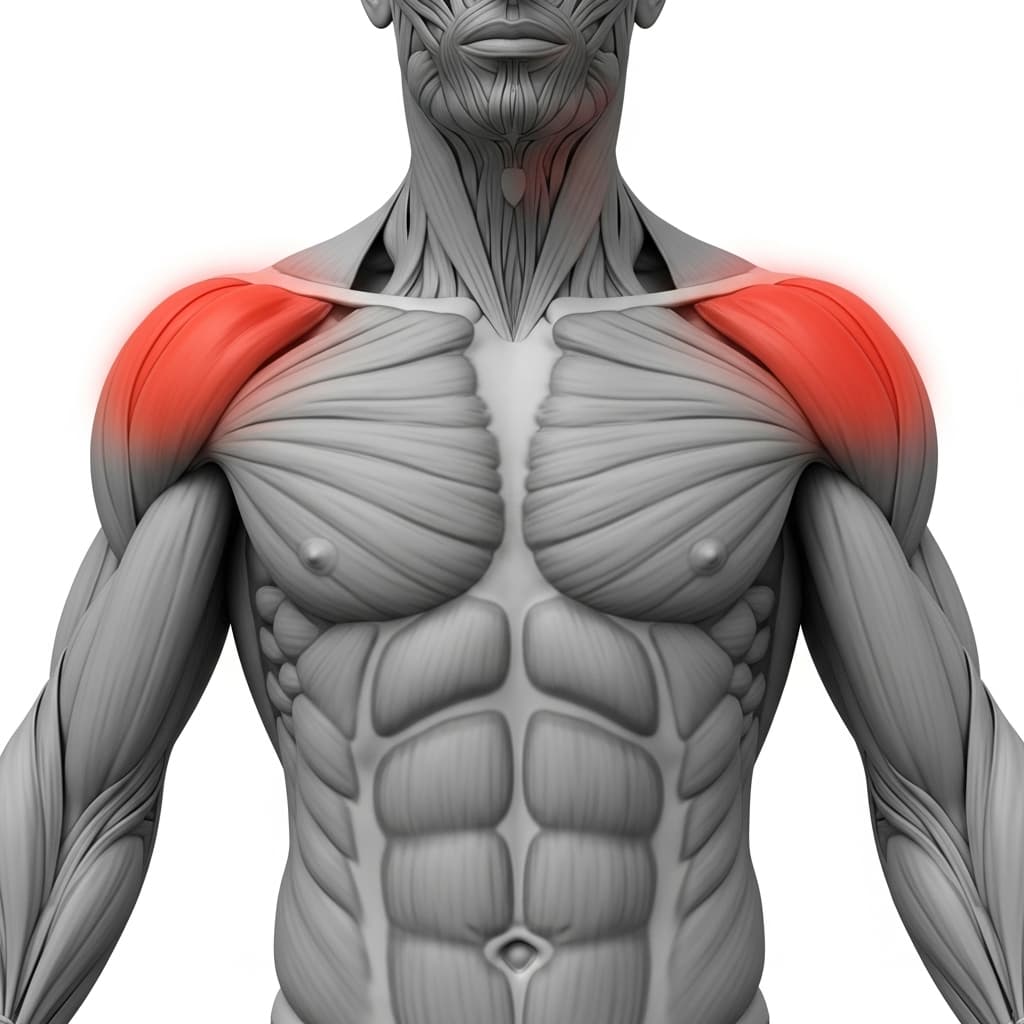
Primary Muscles
Anterior Deltoid (Front Deltoid) - The front deltoids drive the pressing force as the primary mover, extending the shoulder joint to push your body away from the elevated surface through the vertical pressing angle.
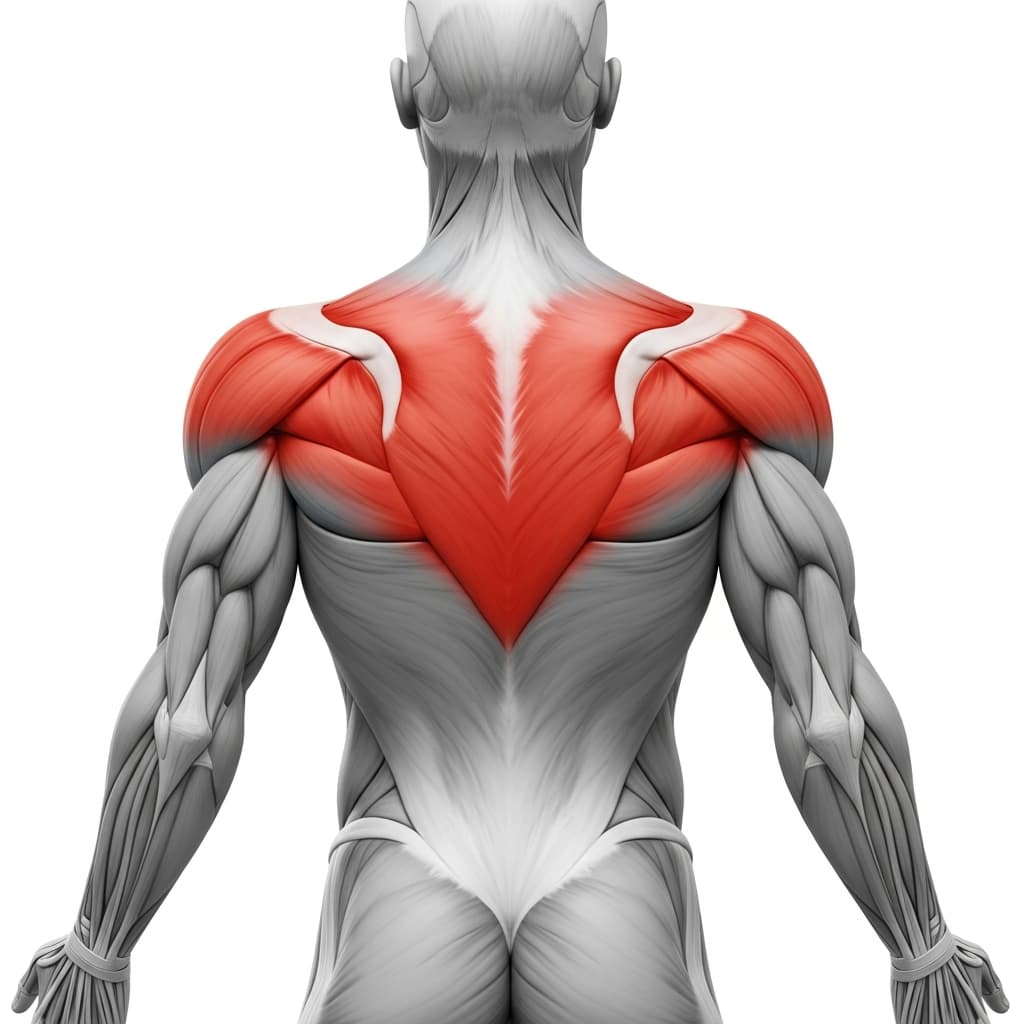
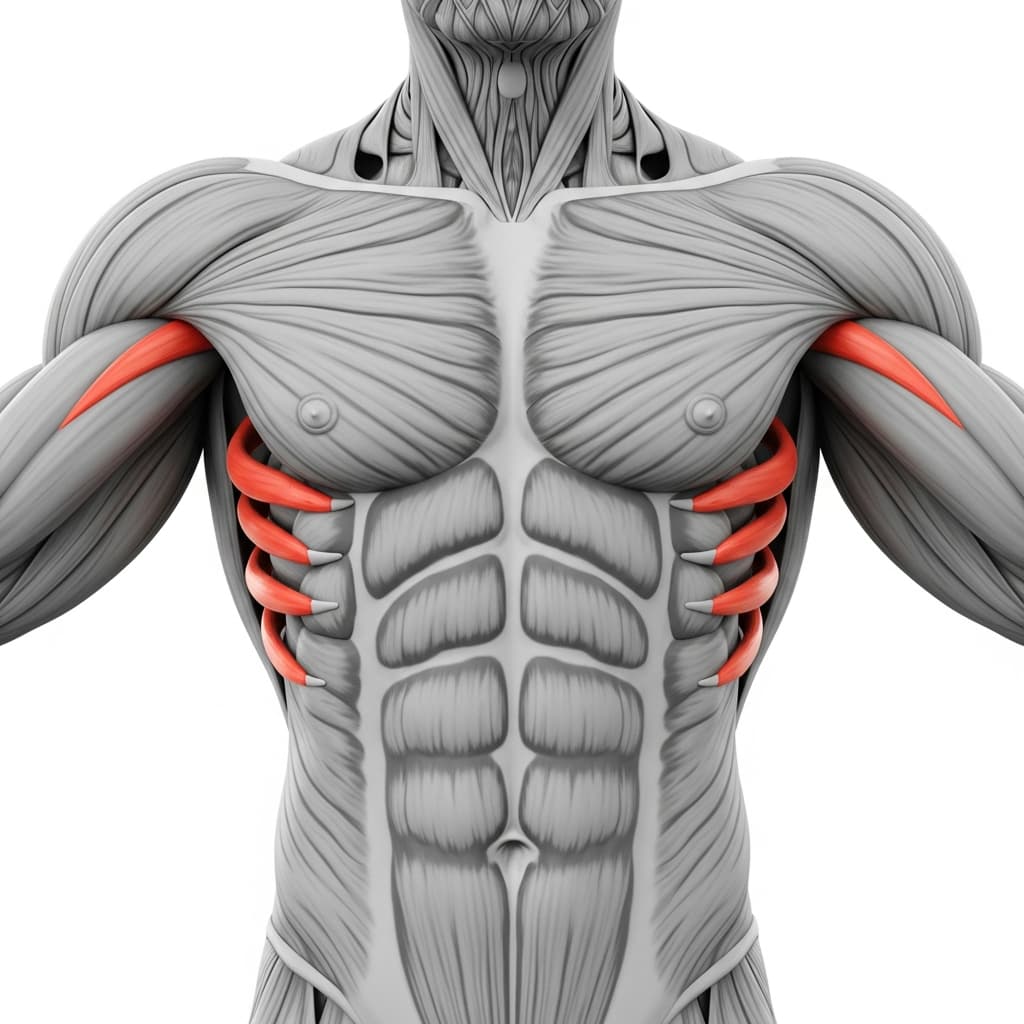
Secondary Muscles
Triceps Brachii (Triceps) - The triceps extend the elbow during the pushing phase, working hardest through the top half of each rep to achieve full lockout.
Rhomboids & Upper Trapezius (Upper Back) - The upper traps and rhomboids stabilize the scapulae throughout the movement, controlling shoulder blade position during both the descent and the press.
Serratus Anterior (Serratus Anterior) - The serratus anterior protracts and upwardly rotates the scapulae at lockout, maintaining a stable shoulder platform at the top of each rep.
Rectus Abdominis (Abs) - The abdominals brace the torso and prevent the hips from sagging, keeping the pike position rigid so pressing force transfers efficiently to the shoulders.
Benefits of Incline Pike Push Ups
- Builds front deltoid pressing strength at a manageable load, creating the direct foundation for pike push-ups and handstand push-ups
- Teaches the correct triangle pressing path and 45-degree elbow position that transfers to every overhead calisthenics skill
- Strengthens the serratus anterior and upper traps through loaded scapular movement, improving overhead stability and shoulder health
- Develops triceps lockout strength in a vertical pressing angle that standard push-ups do not train
Who Is This Exercise For?
You should be able to perform at least 10 clean regular push-ups and hold a downward dog position comfortably for 15 seconds before attempting incline pike push-ups. If maintaining a pike position with straight legs and elevated hips feels unstable, spend more time on push-ups and shoulder mobility work first.
Common Mistakes to Avoid
Letting the hips drop: If your hips sag, the movement turns into a decline push-up and the shoulders lose their primary role. Rise up onto your toes and walk your feet closer to your hands until your hips are stacked as high as possible.
Flaring elbows out to 90 degrees: Keep your elbows at roughly 45 degrees from your torso throughout the descent. Elbows flared wide put excessive stress on the shoulder joint and reduce pressing power.
Lowering the head straight down instead of forward: Your head should travel forward and down so that your hands and head form a triangle at the bottom. Dropping straight down shifts the load off the shoulders and compresses the neck.
Going past 90 degrees at the elbow: Stop the descent when your elbows hit a 90-degree angle. Going deeper than this before you have the strength and mobility risks impingement and breaks your pressing mechanics.